Bicycle Tail Light Review

Over the years I have used many LED tail lights since I do more than my share of night riding on brevets or double-century rides. Below is quick review of many of the popular brands.

I have seen many lights that are have less than 1/2-watt output. Typically, these lights have three or more weak LEDs and although the multiple LEDs may look cute in the store, they simply don’t have the punch or visibility to motorists. I remember on a 400k ride, a friend of mine had one those off-brand 5 LED tail lights. It looked very dim. I mentioned it to him and he changed out the batteries, but to no avail. I asked him what brand it was. He wasn’t sure, but that he got it on eBay for $3 or $4. Later that season he got bumped by the mirror of a passing motorist while commuting home on his bicycle! Fortunately he was not badly injured — in fact he stayed upright and was not knocked over. Shortly after that, myself and another friend each bought him a 1/2-watt tail light.
Your safety is not worth cutting corners when it comes to lighting!

In 2013 I purchased the 2-watt Cygolite Hotshot because it has a USB rechargeable battery, which I was wanted to use on my daily training rides (I put a piece of gaffer tape on the top of it to act as an awning so it shows, even during the day). The Hotshot mounting system is a really bad design. Despite tightening to the maximum, it still drooped as shown in the photo, pointing down to the ground. So I taped it on the top, holding it parallel to the ground and then on a 50-mile ride, it just fell off (unbeknownst to me!). This light always had too many adjustable settings and was confusing. On a 600K, one of my fellow riders with a Cygolite Hotshot tail light mount also failed (while crossing some rumble strips near Zion National Park in Utah), leaving his light somewhere along the side of the road. Although I like their now-discontinued Turbo 740Xtra headlights a lot, I cannot recommend the original Cygolite Hotshot tail light.

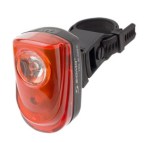
The PrincetonTec Swerve has a great 1/2 watt lighting random flash pattern (I don’t recommend anything less than 1/2 watt). It does droop a little too (but not near as much as the Cygloite Hotshot). By using an extra 0-ring or a smaller o-ring that supplied, I have been able to stabilize this light. The switch is large and very easy to use. The claimed burn time is 24 hours for constant and 70 hours in flash mode with two AAA batteries.

The Planet Bike tail lights have reported leakage problems in heavy rain, so many cyclists mount them upside down. I have never used them and have found the lighting pattern on the Swerve and Tail Blazer to be superior anyway.

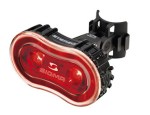
I have tested the 1/2 watt Sigma Tail Blazer. It doesn’t droop and the mount appears secure the clip on the back of the light fails very easily when attached to a bicycle frame. It has two 1/2 watt LEDs. Regretfully (June 2014), on a recent 600K ride, while crossing over some rumble strips, the clip mount on the back of the light sheared off and the light hit the deck. It didn’t shatter, but was useless as I couldn’t remount it to my seat stay, or even attach it to a bag. Although Sigma quickly sent me a new unit, the design is unchanged. The switch is flush “under the shell” button that is hard to use with gloved hands. Even with no gloves, I have had to use my fingernails to jab it “just right” to turn this on or off. At least it won’t turn on accidentally while in transport. I cannot recommend this discontinued model except when attached to an ankle band.

This summer (2013) I purchased the new Sigma Stereo. It is a USB rechargeable tail light. I used it, simultaneously with a Tail Blazer this summer while on a 3-day 1200K. The Tail Blazer was much, much brighter, according to other cyclists that rode behind me. The Stereo wastes it wattage by illuminating a cute ring or border around the perimeter of the light, which does nothing to attract motorists at a distance. I cannot recommend this tail light either.

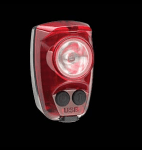
November 2013 Update: I picked up a Lezyne Micro Drive. It is designed ONLY to fit on a seatpost. I use this light for daylight use. It is rated at 100 lumens in flash mode. It is USB rechargeable and is reasonably bright for daylight use. (They have now have a newer model called the Micro Drive 180 that is brighter). I also made a small awning out of gaffer tape, so the light is more visible during the day. I now use it regularly on training rides as it only lasts 3–4 hours. The build quality (CNC machining) on all Lezyne products is incredible. For a front daylight running light, I use the similarly designed Lezyne Hecto Drive, which is rated at 70 lumens in flash mode.

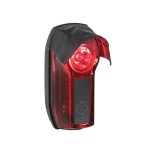
During the summer of 2014 one of my distributors starting carrying Portland Design Works (PDW) lights, so I decided to give some of them a try. I tried the USB-rechargeable Aether Demon (1/2 watt) and the RADBOT 1000. The Aether Demon is not quite as bright as the Lezyne Micro Driver Rear, but I can get about eight hours in blink mode from it. In September of 2104 I did a 420-mile relay race solo style, with about 500 others (there were only 9 solo riders). My support crew that was following me reported that the combination of the 1-watt PDW Radbot 1000 on my seat stay and a 1/2-watt Sigma Tail Light mounted to my ankle, was “hands down” brighter than any other cyclist they saw that night…and they saw hundreds of them. The only thing I do not like about the RADBOT 1000 is that it requires a flat Phillips screwdriver to open it when replacing the AAA batteries — but then, one needn’t worry about the front part of the light separating from the base as is the case with some other brands (many cyclists wrap rubber bands around their lights for this purpose “just to be sure,” but that is NOT necessary with this light). Also, there is no rubber gasket seal like the PrincetonTec Swerve, so I am left to wonder if it will leak in heavy rains. I asked the rep at PDW about rain and the response was “We do certainly see some lights come back that have had water leaks but it’s always hard to tell if it is an issue with the light or weather the rubber gasket got popped out a little when batteries were changed. Living in the Pacific Northwest we certainly put all our lights to the test on a regular basis as far as rain goes.” As a side, the 1/2-watt PDW Danger Zone doesn’t require a screwdriver to open. All three of these PDW lights use the same mount, which has a little slop where the clip on the light mounts to the mount, thus hopefully providing a some give, yielding a “rumble strip, fail safe” attachment.

Many of the reviews (i.e. as seen on REI.com) do not give the Niterider Sentinel 150 glowing reports. The mount has issues and fails easily. It also doesn’t have a memory so when one shuts it off, it doesn’t restart on the same mode.

Fall 2017 Update: PDW has introduced the Daybot USB Tail Light. It puts out up to 100 lumens for daylight visibility or it can be switched it to 20 lumens for night use. (The upper LED puts out 100 lumens, whereas the lower LED puts out about 20). It is USB chargeable and claims to provide 20 hours of use in daylight pulse mode (I found it only provides 10 hours when used continually). It uses a different mount than my other PDW lights, so I can’t move it around on my other bikes that have the old-style mount already on them. This light on the night mode is great with it’s quick flashing light, but the daytime mode has a very slow “pulse” cycle. It cycles between the upper brighter LED and lower dimmer LED; the day mode doesn’t have a similar “quick blink” mode. It cycles onto the upper bright light 20 times in 34 seconds. The night quick cycle mode is about 2.5 times faster. I am fearful that a motorist might glance over while the LED is dark and not see me. Perhaps this was done to prolong battery and also to not irritate other commuting cyclists.

In 2017 I purchased a pair of the Seattle Sports GloStraps and attached them to my calf. On a rural 400km brevet (with little ambient city lights) I then asked some friends that were 1/8 to 1/4 mile behind me to evaulate. At distance, it was rather ineffective compared to my 1/2-watt blinky light, which was mounted on my seat stay. There are other brands with similar offerings and my feeling is that they may be useful for commuting or when in traffic as it gives motorists that are in close proximity 180-degree visibility, but for general lighting purposes I would not bother. Instead I have mounted a secondary blinky to my reflective ankle bands.

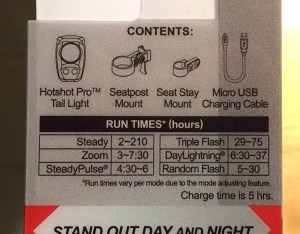
December 2017 Update: I got my hands on the Cygolite Hotshot 150 USB tail light. The tempo of the daylight blinking light setting (they call it DayLighting™) is adjustable (which was my gripe with the runner up light, the PDW Daybot USB) so it can set to a very quick pace at full power with 150 lumens. The slowest setting provides some 38 hours of light (verified). It also has solid modes and for my solo night riding, the Triple Flash mode. The mounts on previous Cygolite tail lights were cheaply designed and broke off when I hit a series of rumble strips. This mount has been redesigned and so so far, it is holding up.

Specs for the Hotshot 150.

There are four factors when choosing a tail light:

  1.  Sturdiness of the mount when used on a seat stay, which is my preferred location. So far, many that I have tried either break off (Sigma & pre-2016 Cygolite) or droop (Princeton Tec with OEM o-rings). The PDW RADBOT 1000 is the best I have tested thus far. On my Trek Domane road bike, the seat stays are very skinny and consequently the clamp-on style lights sometimes require stuffing some scraps of closed cell foam inside so it will clamp down tightly. The Princeton Tec shines in that regard as it uses a stretchy o-ring instead.
  2. If you are doing long “straight through the night” 600K brevets or 24-hour style rides, be careful with the rechargeable models as some only last 5-7 hours (update: many 2017 models have improved run time and now go for 15 to 20 hours blinking on a charge). On the other hand, most AAA-battery models last 20–30 hours.
  3. Brightness. Lights with multiple (i.e. 3-6) LEDs are usually dimmer than one bright light. Get one that is at least 1/2-watt (1 watt preferred) or 50 lumen (150 lumens for day use).
  4. It is weatherproof. Will it leak in heavy rains?
Since I usually have a seat bag of some sort on my saddle, I always mount my blinkie light on the left seatstay.

Summary…

For all daylight rides, I consistently use the Cygolite Hotshot 150 USB as my “daylight running light.” I can get 12 to 15 hours in a moderately slow flash mode.

For night riding, I keep the Hotshot 150 on my bike but turn it off and use either the 1-watt PDW Radbot 1000 or PrincetonTec Swerve mounted to a seat stay. This is supplemented by a Sigma Tail Blazer, mounted to a custom reflective strap on my ankle. I prefer tail lights that attach to the seat stay, as I frequently have a seat bag that covers up the seatpost and attaching a light to the bag rarely yields a light that is facing the correct angle in the back.

For a front daylight running light, consider something with at least 200 lumens and with a single LED, not a light with multiple dimmer LEDs. I have been using the Lezyne Hecto Drive, which only puts out 70 lumens in flash mode.

Aren’t Carbon Fiber Bikes Just Fancy Plastic?

Ever since I started riding with other randonneurs, the mantra has been among many of them that “steel is real,” dismissing carbon fiber as inadequate for long distance cycling. Many of them prefer a steel or titanium frame because of the ride quality and most importantly, the durability. They claim that carbon fiber (and many aluminum frames) simply don’t have the long term strength to hold up to the thousands of miles a typical randonneur puts on, especially over multiple years of use. I figure that I can purchase a carbon fiber bike and if I get five to six years out of it, that is good enough, since it is lighter, which for me, at the age of 58, yields high performance.

In April of 2010 I found a new 2009 Rocky Mountain Prestige 70CR carbon fiber road bike at a Salt Lake City shop. I got this model because it has relaxed geometry including a tall head tube — an important feature for my tall 6′ 4″ height. Rocky bikes are noted for their big lineup of mountain bikes and not for their road bike line. Their retail pricing was typically much less than the big brands like Trek, Cannondale or Specialized. With a close-out discount of 30% I was persuaded to make the purchase.

For the next two years I put on about 13,000 miles on this bike. In the fall of 2011, my local mechanic, while doing an annual maintenance overhaul, which included lubing the bottom bracket, pointed out a hairline fracture on the carbon fiber near where the alloy bottom bracket attaches to the carbon fiber. I took the bike up to the dealer where I made the purchase. They opened it up but didn’t think there was an eminent problem or possible frame failure. The warranty for this bike frame is five years. I continued riding it and the following summer, it started to look worse. This time I e-mailed photos to Rocky Mountain Bikes in Canada for review. After they reviewed the photos they promised me a new frame, which was later (July of 2012) delivered at no charge to me. I did have to pay my local mechanic to strip off the old components and put them on the new frame. Their customer service was professional and quick.

So were my rando-cycling friends correct in indicating that most carbon frames will not last? Do all brands start to crap out after 10 to 15,000 miles? Or is the problem only with this off-brand road frame, whereas a frame from one of the big three manufactures would last longer? I believe that many randonneurs, quite frankly, just like the aesthetics of old school components. Personally, I just look at the end of the day practical performance, without regard to how cool or vintage my gear looks. I honestly thought I would get five or six years out of this frame, and then if necessary, purchase another frame to replace it. (I affectionately refer to this bike as my “Tuperware bike” since carbon fiber is basically a “plastic” right?) I read recently that the Cannondale pro team gets four new bikes every season (two racing bikes, one training bike and a time trial bike). They would never have a chance to literally wear one out as I did. Most “average Joe” cyclists, that do two or three century rides a season, put on maybe 1,000 to 2,000 miles a year. At that rate, they would never wear out a frame before the components became “old school” and not worthy or stylish to ride in public. So are carbon fiber bikes designed like most consumer vacuum cleaners…to barely last past the warranty period? (I was told this by a Wal-Mart manager—I own a German-made commercial vacuum in our household.)

Meanwhile, I now have a new “Tuperware” bike, but I have also taken preventative measures to prolong the life of that frame. Since then I have acquired other road bikes to spread out the mileage. First I purchased a used 2009 Cannondale CAAD10 aluminum cyclo-cross bike, which now has full fenders for wet-weather training rides or dirt road riding. I can put either road slicks or narrow knobby tires on it. And then more recently, I acquired a 2nd-hand Seven Axiom titanium road bike (the owner was replacing it with a Specialized Tarmac carbon fiber racing frame). I am currently in the process of building it up (including an extra long custom crank) and will have a review on it later. Depending how I like the Seven bike, I may use that frame instead of the Rocky for long events, despite it’s increased weight. (In September I achieved a new personal record on the Seven bike with it’s original components [clunky 53/39 double & a worn out BB]…a 6:59 solo 200K). Titanium is supposed to almost last forever, making it a lifetime investment. The frame I purchased is ten years old and has no indication of hairline fractures or frame problems. Stay tuned, as I ride the Seven Axiom more, with the new crank and gearing, which I just received last week, I will have better opinion on whether steel (or ti) is really more real.

On a side note, on the chain stays of the Rocky frame, it says in bold type “Built in Canada,” yet the new frame, when it was delivered, clearly said “Made in China.” So does that mean the frame is made in China and the components are added in Canada? Hmmm….these days, nearly every frame is made in either Taiwan or China, so it really comes as no surprise.

Garmin Fenix & Garmin 310XT Wristwatch GPS Review

I want to mention five things about these two devices:

1. Faulty Heart Rate Straps In May of 2012 I purchased the Garmin 310XT wristwatch style “triathlon,” multi-sport GPS. I got it primarily for use with SUP, but also starting using it for cycling (and uploading my rides to Strava). It was supplied with their “premium” heart rate monitor chest strap. When I travel fast on the bike (isn’t that the point of a road bike?), the wind created static electricity causing erroneous readings. Several of my friends have a similar issue with their Garmins. The readings were way too high. At the recent Interbike show I stopped by the ANT+ booth and talked themas this device uses this 2.4 GHz standard. They said it is known problem and suggested I “upgrade” to the standard chest strap. (The ANT+ group is owned by Garmin I was told). After getting a second premium strap from Garmin that didn’t work, they finally sent me a standard one and the problem is now almost gone, but does happen on occasion while cycling. (I will say that their customer service was actually pretty quick and they responded to my e-mails in a punctual manner once I got a “repair ticket” going).

2. Waypoint Downloading Problems There was one major flaw when using the 310XT with SUP. When I was attempting to following a route, it was difficult to do on a paddle board because there is no path or road. Consequently, when I got off route (which was often), the GPS freaked out and told me to go backwards to get back on route. (For recording where I have been this unit was OK, but sometimes, like when crossing a wide lake, I want to be able to know where to go, just not just recording where I have been.) So the only way to do long distance SUP travel with a GPS is to put in individual waypoints (which I put it at home using an online mapping app) and “go to” each waypoint. Upon arriving at the waypoint, I reset the GPS with my next pre-programmed point and so forth. I attempted to “go to” the beginning route instead of a waypoint, but by doing this, it recorded each new “go to” as a complete new event, thus making it impossible to record a “complete” event at the end of the day. The problem with the 310XT is that it would not accept downloading from an external source waypoint coordinates—dumb.

3. Lousy Instruction Manuals So, yesterday I took back my Garmin 310XT wrist watch GPS to REI and got full credit and upgraded to the new fenix. It is now doing what I want…that is I can download ind. waypoints from the web and complete routes without. No complete instruction manual was included (only a quick how to brochure). I downloaded the PDF online documentation but it failed to give me a clue what the abbreviations for the data fields mean (the old 310XT documentation DID indicate this). For example what do these mean?
CMP HDNG
Final ETE
Final VDST
Final VSPD
TDD
Next ETE
Next VDST

After doing several Google searches, I found this obscure Swiss site that had the documentation I was seeking.

So what’s new with the Garmin? Same lousy documentation as always (one would think that for a $470 purchase, it might include at least some decent PDF documentation). When you are king of the hill there is no motivation to change.

4. Wireless vs. Wired Oddly enough, the new fenix now ONLY connects to my Garmin via a USB cable, instead of the easier-to use ANT+ wireless system found on the older 310XT. That is odd, going from wireless to WIRED?

5. Maximum Heart Rate Oh, one last thing, while I’m venting. My Sigma heart rate monitor was much more sophisticated in it’s analysis of cardio data displayed one very important stat: the maximum heart attained during a workout. Both of these Garmins, despite having some 50 odd data fields, do NOT display this simple stat—instead I have to wait until I get home and download the data to their website. Dumb. (When doing intervals I LIKE to know, right after a 5 or 10-minute gut-wrenching hill climb, where I maxed out.)

Admundson 14’0″ SUP Board Review


Amundson Design 14’0″ TR-X Carbon (distributed by Aquaglide, shaped by John Amundson of Hawaii)

After purchasing a 12′ 6″ board, I knew that for any long distance stand-up I would need a fourteen footer. In August I rode several models at the Outdoor Retailer show and decided that the 27-inch wide boards were just a little too unstable for multi-hour touring. (This was also confirmed my several of the manufactures as they discouraged me from considering their narrow race boards for touring). They work fine for a short races, but trying to stay upright in variable conditions for hours on end seemed too difficult.

I was attracted to this board for the foll0wing reasons:

  • It was lighter in weight due to the carbon construction
  • It had built-in deck inserts for gear tie downs
  • It was more stable with it’s 28-inch width than other narrower models
  • It had a displacement-like or “canoe style” nose
  • And although this is a minor point…I got special trade pricing direct through the manufacturer.

I have only used the board about three times now. My first experience was dreadful as I had very choppy conditions with winds approaching perhaps 15 MPH. Going straight into the wind, or in a downwinder direction was OK, but the minute I turned cross wind, I had a difficult time staying upright in the 1-foot+ waves.

Later tests proved that this board is about 9% faster than my 12’6″ board. Last week, I did a 19-mile Utah Lake “double crossing,” averaging about 4.7 MPH for this multi-hour paddle in decent (nearly wind free) conditions. My average multi-hour speed on the shorter board was 4.3 MPH in similar conditions. Unlike my shorter board, this board drains much better as little water accumulated on the deck. It is called a “TR” board as it is classified as a Tour/Race board.

This brand is not noted for their “race” pedigree as most of their current line of SUP boards appear to be for recreation use. But then…I was not looking for a fast touring board, not a so-called race board, so I figured that their designs would be OK for my needs. This board has a list price of about $2,100. It included a breather hole with a large Phillips screw (instead of a breathable “GoreTex” type membrane as found on some boards). It has a rated volume of 275 liters and is sold as a 7-1/4″ thick board, but overall it appears much thinner than this. The claimed weight is 27 pounds.


New Shimano 11-speed Drive Train

This month, Shimano announced a new 9000-series, eleven speed drive train for road bikes. At this point, it is only available in Dura-Ace, and not for their Di2 electronic shifting. The grouppo includes a new STI shifter set, cassette, crankarm (in both compact & regular), bottom bracket, chain and a front and rear derailleur. For me, this is not a big deal, since I already have several bikes and wheel sets that use 10-speed. This is a case of “keeping up with the Jones” (Campy). Now one has to wonder if Sram will follow suit.

Dura-Ace 11 Speed

What Camera to Buy?

As a professional photographer I frequently get asked about recommendations for cameras. Below is a summary of my thoughts. The links are subject to immediate change…so they may not be relevant a month from now!

Factors

  1. Is the size of the camera an issue? There are three styles:
    – The smallest are “point & shoots” (P&S). Most are about as big as cell phone and will fit in a shirt pocket. Some models are a little larger which have a bigger zoom range and better optics. The thing I hate about them is there is typically a delay between when you press the release to when the photo is actually captured. I use Rebecca’s (my spouse) Canon P&S when doing outdoor stuff like cycling, hiking, backcountry skiing etc. where weight is an issue.
    – The largest are DSLRs which stands for digital single-lens reflex. They have interchangeable lenses. It seems 90% of people never buy a second lens anyway, so why both with the extra expense and bulk of a DLSR then?
    – The new (2011) mirrorless cameras & Micro 4/3s split the difference between a P&S and a DSLR. They have interchangeable lenses, but are more compact because they don’t have the bulky glass prism on top and the mirror housing (this combination is what is called “reflex”). Some of the Micro 4/3s do have a pentaprism, but the bodies are still smaller than DSLRs.
  2. What is your budget? This is like buying a car stereo system. They all look the same…but the more you pay, the better the sound quality. For $500 you can get an EOS Rebel T-3 (digital single lens reflex). It has 12 megapixels — plenty of resolution. It is one of the smaller DSLRs, but is still bulkier than the new mirrorless. If I was buying a DSLR I would get an low end or average body and spend more money on a better lens with a bigger zoom range.
  3. Do you need to shoot in dim lighting or at night? Tourists shooting inside museums without flash, night shots of the city, or taking pictures of your kids basketball game in a poorly lit gymnasium will want a “faster” lens. The speed of a lens is often ignored by amateurs as they get caught up with the big telephoto zoom ranges that are advertised. But unless you are shooting a soccer game from the other end of the field, I personally think that a faster lens with a smaller zoom range is a better investment. A faster lens is one that has a smaller number for the F-stop. F1.4 to F2.8 lenses let in more light that a “slower” lens with a higher number like a F4.0, F5.6 or even the dreadfully slow F6.3 found on some super zooms. Most zooms have an F-stop that changes as one zooms the lens in and out, which is why you will see a lens with a “F3.5-F5.6” lens—F3.5 is the f-stop at the wide angle end, changing to F5.6 at the telephoto end. In other words, as you zoom in more (making your subject bigger in the viewfinder) the lens reduces the amount of light available. Nearly all cameras, excepting a DSLR may struggle with trying to auto-focus in low light. After shooting in dim light, with a non-DSLR, it is wise to double check your focus by zooming in on your LCD image afterwards.
  4. Do you need a huge zoom range? If you are shooting wildlife (especially birds) or fast breaking sports, then generally a Micro 4/3s with a pentaprism or a DSLR is the best bet.
  5. Do you plan on making large prints? Most consumers only make 4×6″ or 8×10″ prints or post their images to Facebook. Any camera with 5 to 8 megapixels of resolution will work for that. But, if you plan to blow them up to 11×14″ or 16×20″, then a high-end mirrorless (with a large APS-C sensor), a good 4/3s, or preferable a DSLR camera will be required. Look for one with 12-18+ megapixels. The bigger then sensor, the better (which is why DLSRs offer the best quality of all cameras).
  6. Do you shoot fast action wildlife or sports? Mirrorless cameras can’t track fast subjects very well, so choose a DSLR or a 4/3s camera with a pentaprsim or SLR feature.
  7. Do you want to shoot decent video also? Most “still” or picture cameras over $400 shoot HD video now, but those with larger sensors should provide better quality.
  8. Do you need shallow depth of field? Depth of field is controlled by a combination of the lens and F-stop. For still life photos or portraits that have a nice blurry foreground and/or foreground (called selective focus), then a telephoto lens with a “fast” lens is a must, something that is rarely found on a P&S. If your P&S camera has a fast F-stop, like F2.0 to F2.8 AND you use aperture priority or manual (setting the F-stop to a smaller number) you could achieve this affect.
    These days, the iPhone app Instagram, one can achieve a very good shallow depth of field look too.

The links noted are to B & H Photo, a reputable place in NY that is the largest in the world and usually has the best “US” prices. Many other dealers undercut them by offering brand-x warranties (B & H also has their own warrant policy but they clear state it). The problem with a brand-x warranty is that one sometimes has to send the camera overseas for repairs, which takes forever. When possible, be sure you are getting the manufacturers genuine USA warranty.

Types of Cameras

  • Cell Phone
    One problem with cell phone cameras is the zoom range. Nearly all of them use a “digital zoom,” which is really bogus as it is merlely cropping into the image, which reduces the pixel count resolution. One is usually better off, cropping later in Photoshop. Also, since the lenses are so small, they have trouble taking good shots in poor (dark) lit conditions without blurry images do to a long exposure. Nokia has taken a revolutionary approach with their model 808, by placing a huge 41 megapixel sensor in their camera and then allowing one to crop later, without losing date, providing a “good” 5 megapixel cropped image.
  • Point & Shoot (P&S)
    Those with big zoom ranges, like the Canon PowerShot SX50 HS have a huge zoom range (24-1200mm equal) but the f-stop of that lens is F3.4–F6.5 which is “slow.” That means it is great for shooting your son in a soccer game 1/4 mile away, but lousy for shoot interiors of a dimly lit home or museum. It is a larger P&S and is also bad for “shoot your daughter in an indoor soccer game” jobs. The Canon PowerShot G15 is MUCH better for low light as the F-stop range is F1.8–F2.8. The zoom range is adequate at 28-140mm. If you looking for something very compact, then also look at the Canon PowerShot S110. It has processes RAW files too. The price on these is from $400 to $700. If you need a camera that is waterproof and shockproof, then look at Olympus or Pentax as that seems to be their niche.
    The biggest advantage of point-n-shoot cameras is that the sensor is much smaller than 4/3 or most mirrorless cameras, so consequently, they can design them with fast lenses (better for low light) that are much more compact than an equally fast lens on larger-sensored cameras like mirrorless, 4/3 and of course all DSLRs. Typically, the lenses are not interchangeable, but for most people looking at DSLR alternatives, an extra lens is a nuisance anyway.
  • Micro 4/3
    The Panasonic Lumix DMC  is a mirrorless hybrid that falls between a P&S and a DSLR and also falls into the Mirco 4/3s category. (Micro 4/3s sensors are half the size of a full frame sensor, or approx. 12 x 18mm in size and supposedly all brands of lenses are interchangeable with each other.) Panasonic has lead the way with many “pro” style focal lenses, like the 12-35mm F2.8 and 35-100 F2.8 (both excellent in low light, but have a smaller zoom range than the slower lenses). They also offer a decent “all around” lens that has good low light coverage, the 14-50mm F2.8-5.6 ($850, equal to 28-100mm on a full frame DSLR). This series has interchangeable lenses that are SMALL unlike DSLR lenses. My brother has one and has been basically happy with it (although for work photos lately he just uses his iPhone — but he doesn’t shoot kids playing soccer etc.). If you wanted to get a review on the Panasonic or others, visit this site for more info than you have to time for. Panasonic and Olympus are the leaders in providing the best lens selection for this market.
    The Nikon 1 looks very promising and has many lenses already available including the nice all around 10-100mm F4.5-5.6 (kinda lousy for night or dim lit photography however). At the time of this writing, the cheapest model is the J2 which runs about $550.
    Oddly enough Canon has avoided the whole 4/3s scene. Fujifilm and Samsung have also entered this market.
  • Mirrorless (this is where the categories getting blurry, as some Micro 4/3s are single lens reflex, while others or mirrorless!)
    The Canon mirrorless is called the Canon M and runs about $800 for a prime or non-zoom lens. Most people will want a zoom lens, so I’m not sure why they don’t package it with one up front (that is due to change I’m sure). If you own, or have family members, that have a Canon EOS DSLR system, those lenses will fit on this camera with an optional $200 adapter. Right now, they have only a few M-specific lenses available. Many mirrorless cameras have APS-C sensors which are on par with those found in most DSLRs. Some of these sensor are even larger than the Micro 4/3s cameras.
    Some of the new Micro 4/3s are also mirrorless and also fall into this category. Also check out this article on DPReview.
  • DSLR
    The big rivalry is between Canon and Nikon. As far as brands go, I have always preferred Canon, having switched from Nikon to Canon back in the late 1970s. From the 1950s to the 1980s, Nikon was king of the hill in the SLR (film) world. When Canon first introduced the EOS auto focus series, it blew away Nikon as it was so much faster. That was because they put the motors in the lens and not in the camera body. Most pros switched over to Canon, especially photojournalists and sports shooters. Nikon finally came around with decent auto focus lenses, but they had lost a lot of market share. Now things are pretty even. Some say the optics on Nikon cameras are better and that their on-camera flash and metering systems are better. Others like Canon as the new EOS mount is larger than the old Nikon standard, thus creating a stronger connection and allowing more ingenious lens designs.
    Nearly all DSLR models now shoot HD video, so any body will do the job. I would recommend getting something better than the standard “kit” lens which is usually an 18-55mm. Do not get the 28-135mm that Canon offers, unless you are getting a more expensive body with “full frame” sensor (like the Canon 6D or the Nikon D3 or D600), as you will have no wide angle range. Personally, I feel full-frame sensors are not worth the extra expense. If you can afford it, get a lens with a half-way decent zoom range, like a 17-85mm, 18–105mm or 18-135mm lens. My daughter Rose got this model instead as the lens is better for video (more range), but it is $1800. The 18-135mm lens is a sweet combination ideal for most travel photos. If you want to shoot indoor Pintrest style selective focus shots of your kids or still life shots (food or craft), when a fixed focal length or “prime” lens is fun to own. Pick a 50mm F1.4 or 85mm F1.8 lens. They are slight telephoto and good for close in shots, but not so good for group people shots inside with limited space.

Summary

Most people are looking for a good “street” or all around “tourist” camera with one lens. Here’s some choices….if cost were no object, and I wanted a very compact camera for making decent quality big prints, then I would consider the mirrorless Panasonic DMC-GF5 (or similar model) with the Leica 14-50mm F2.8-3.5 lens. This zoom range is pretty limited, but it is pretty good in low light. If low light shooting is not an issue, and you wanted a more telephoto reach, then choose the less expensive 14-150mm F3.5-F5.6 lens. It would not be particularly good for sports photography however. If you wanted a smaller device, but were less concerned about making jumbo prints, then the Canon G15 would be a good choice as a mid-sized point and shoot camera. If you must have the smallest thing around (i.e. for backpacking or trail running), then look at the Canon S110. I like this model as it shoots in RAW, something many P&Ss don’t do.

What do I own? I own a Canon 7D DLSR (APS-C sensor size) with numerous lenses. Ironically, I don’t have one all-purpose “street lens.” Instead, I end up bringing two: a 10-22mm F3.5-F4.5 super wide angle and a 24-105mm L-series F4.0 as my all purpose lens combo (i.e. my 2011 trip to Europe). If I were to purchase one all purpose “tourist and family shots” lens, it would be the Canon EF 18-135mm F3.5-5.6. Another two-lens choice I have looked at would be the EF 15-88mm F3.5-F5.6 (a bit wider for interiors than the 18-135), supplemented by a fast, medium teleph0to prime (fixed focal length) like a 100mm F2.0 or 135mm F2.0 lens. Either of those telephotos would provide killer selective focus shots due to their big aperture and conversion factor when used with a smaller than full frame APS-C sensor.

2014 Quick Update

Check out this overview written in December of 2013. In particular, look at the Canon Powershot G16 with it’s super fast lens (good for available light, something most DSLR “kit” lenses don’ even offer).

Last Updated: Feb. 2014

Liquid Oxygen & Giardia

A few years ago, a nephew of mine, who works at an outdoor wilderness program, indicated that this product called Areobic 07, (there are other similar products under other brands) was effective in treating water in the outdoor environment. They supposedly drank out of cow troughs, out of creeks, lakes, yet in several years of using this product on a daily basis, never had a reported case of Girardia (their dose was 4-6 drops per liter). I liked using it because it was much portable and convenient that a water filter and used it off and on for a couple of seasons of backpacking and trail running.

During the summer of 2009, I went backpacking for one night with my scout troop, which included my teen-age son. We camped near a creek that had many active beaver dams on it (Fish Creek which feeds into Scofield Reservoir in Central Utah). After we ran out of city water which we brought with us, my son and I both filled our 1-liter water bottles from the clear-running creek. We added about 6 to 8 drops of O7 to each bottle. We waited a half an hour and then drank as needed. None of the scouts used the O7. I had a Katadyn Hiker Microfilter for them, if they needed to refill their bottles, but none needed to. About two weeks later, my son and both came down with flu-like symptoms. After some rather expensive lab tests, it was confirmed we both had Giardia (Giardiasis). Within a few days, the problem was remedied with oral medication.

Was my dosage too low? Did I not wait long enough? This bottle is a few years old — has it expired (no date indicated on the bottle). Is it supposed to be effective as most water “filters,” but not as effective as the commercial “purifiers?” (There is a difference between backcountry filters and purifiers but off-hand, I can’t tell you what that is). Needless to say, I can no longer trust this product for the purpose of purifying questionable water (the distributor of this product currently make so such claims, but may have done so years ago). I guess I need to fall back on my rather heavy and bulky microfilter pumps or try the new batch of UV treatment methods (Steripen), which have been proven to treat water (unless is muddy).

Isle San Diego Racing/Touring SUP Board Review

In September I purchased my first stan- up paddleboard. I found a deal on a used Wave Storm 10′ 6″ board. These were recently sold at Costco. I found one online review and it was pretty favorable, especially considering the price, which was about $800 for a new board. After purchasing it, I did more online research (I usually do that in reverse), discovering that a 10′ 6″ board is suitable for those weighing about 170 lbs. or less. I’m 6-4 / 185. This board (the blue one in the above pix) is a foam board construction with a plastic base. It has a planing nose or hull, which is best for those using a board on the coast where there are waves. The fastest I could clock it on windless flat water was an average speed of 4.0 MPH. This was for a 30- to 45-minute workout, going “all out” for my novice ability level, doing an out and back trip.

I decided that if I was going to get serious with this sport, I needed a longer board or two. I figured that I needed a training board and then perhaps a “racing” board for more ambitious events. In my mind, that meant a 12′ 6″ fiberglass board (read “durable”) and then a 14′ 0″ carbon fiber board (more fragile, but faster).

I looked at the new prices for 12′ 6″ boards and they in the $1300-$1700 range. I could not find a local used board with a displacement nose. Since this was for training, I decided to go with a rather unknown board, made by Isle Standup Paddle Boards San Diego. I got a small pro discount, so the board cost less than a grand. (Their business model is similar to my camera bag business in as much as they deal mostly customer-direct, providing a better value — no middle man dealer or distributor). I liked their honest SUP Comparison Chart that showed the difference in stability between displacement vs. planing nose designs. This board has a displacement nose similar to a kayak or canoe. This feature was found only on the more expensive boards, but is desirable for flat water paddling. I had already purchased a carbon fiber paddle so I did not purchase theirs (they only run a $100 with the purchase of a board — a heck of a value, although they only offer a “wide body” 9″ paddle which I don’t care for). The board has a nice smooth finish and the inside is made from 1.5 lb. EPS foam inside with a rugged-looking fiberglass outer skin. I liked the fact that this board had a recessed deck, putting my weight lower in the water.

My first run on this new board at a local reservoir was in awful conditions with 15-18 MPH cold winds (ambient temps about 45F) and chop. While I was boarding, I could see the blowing snow in the mountains, just a few miles to the east the reservoir which I was on (Gunnison Reservoir). I fell off the board once, while trying to navigate in a cross wind. I finally sat down and paddled for a while until the wind subsided a bit. I found this board to be a bit less stable than the Wave Storm board, but that is to be expected because of the v-shaped nose. With the Wave Storm, while paddling in flat water I could comfortably turn my head around and look at the stern without falling over. With the ISD board, I have to be VERY careful making this move, or I’d be in the drink. With this board, I have found that I like to place my feet at a slight angle against the outer  edges of this “bathtub wall” for maximum stability and comfort. Despite having an angled deck, the water still builds up a little in the recessed pad where one stands. I did find that the displacement nose of the Isle board fared better in chop (waves caused by wind) than the planing nose of the WS. The WS nose kept slapping up and down, whereas the ISD just sliced through it more easily.

Upon testing this board on a more calm day(s), I was able to push my speed up to 4.5 MPH for a 30-minute out-and-back loop (for a 2-minute sprint, I averaged 4.8 MPH). An increase of 0.5 MPH over the el cheapo Costco board doesn’t seem like much, until you look at it as a percentage — that is a 12.5% increase in speed. I was hoping for more, but then this board, despite be called a Racing/Touring paddleboard, is not recognized as a fast one. In fact the company rep indicated that it was NOT a particularly fast board, but a good all-purpose unit. I have been told that some local paddlers, on 14′ 0″ race boards typically average 5.3 to 5.4 MPH for a 2-hour, 8- to 10-mile workout. Of course, I’m 57 years old and they might be half my age (I come from an endurance cyclist background so this upper body stuff brand new to me). Still, I wonder what the speed difference between two similarly designed boards of different lengths might be — that is a 12′ 6″ versus a 14′ 0″ board, both with displacement noses. I have heard that in flat water races, the difference in times between these two categories is about 20%. Or is that simply that the tougher guys have longer boards and the real speed difference is more like 10-15%? So the $64,000-question is…will a 14-0 carbon board yield a 15% gain in speed for me? If so, that would translate to an average speed of 5.175 MPH. A 20% increase would yield speeds of 5.4 MPH. I guess if I take the 14-0 plunge, it will be next spring and I’ll find out!

This month, the average highs here in Utah are only in the mid 40s with water temps around 38-40F, so I have no desire to purchase another board until it warms up next spring. Wearing a wet suit is mandtory, although for a flatwater workout with only a mild breeze, I never fall in. The wetsuit is just insurance — sometimes I get too hot and shed my upper non-wetsuit layer.

Overall, I’m happy with the purchase, except one thing that bugs me…the recessed carry handle is NOT centered on the board so it tips towards the stern (fin side) when carried under the arm. I know this is not rated a “high end” board, but hey guys, at least center the carry handle — something the off brand Wave Storm board did!

Specs:
Wave Storm Board: 10′ 6″ long x 29-1/2″ wide x approx. 5-3/4″ thick.
Isle San Diego Racing/Touring Epoxy SUP Board: 12′ 6″ long x 29-1/2″wide x 7″ thick. Claimed weight is 32 lbs.

Breaking in a Leather Saddle (quickly)

During the spring of 2011 I made the decision to try out a tensioned, unpadded leather saddle again. My previous experience with a 100% leather saddle was using the Selle-Anatomica, which doesn’t require any break in. But that saddle was heavy (no titanium model available) and the slit down the middle was not terribly comfortable for me while using aerobars. Gilles Berthoud are French-made saddles which are supposedly pre-softened, but frankly I can’t tell the difference between a new “factory softened” GB and a new Brooks, so decided to speed things along myself.

Please note that most leather saddles that have a fabric backing, i.e. Rivet and some others, will not soften much, if at all, using these techniques. On one Rivet I managed to tear off the backing which did provide a slightly softer perch.

Nearly every saddle maker says not to put anything on their saddles but their own brand of treatment stuff. They claim that oils will break down the leather too quickly—but honestly, who has the patience and endurance to sit on rock-hard saddle for three or four months while it gets broken in? The Brooks Proofide “stuff” is (or was) made from tallow, cod oil, vegetable oil, paraffin wax, bees was and citronella oil. GB also sells a small tin of “leather wax.” They both look a lot like Sno-Seal, the bees wax substance I used in the 70s to waterproof my leather mountaineering boots. But then, the purpose of Sno-Seal wasn’t to make the leather softer, rather it’s purpose was to make the leather more water resistant. One brand of mink oil, on the hand, contains a “rich blend of mink oil, silicone and lanolin which conditions and waterproofs smooth leather.”

I learned of two different methods from reliable sources of how to break in a leather saddle:

The first method I learned was similar to the directions found on Sno-Seal treatment product. The recommendation, which came from a friend that has several of the rather expensive Brooks Swift saddles. Here is what he suggested to do: “Get some mink oil, slather the saddle inside and out then bake at 150 degrees F for about 15 minutes or until the oil soaks in completely. Let it cool and buff the saddle out, it will be a chalky white. Then rub in another light coat of oil at room temp on the seat side. You will be good to go. I rode a double century on a brand new Brooks Swift saddle like this. Don’t be afraid to adjust the nut to get tension right on the leather. You will know when it is right.”

The second method is slightly more complicated, but is the technique I generally prefer because it gets the leather softer for quicker break in. This is recommended by the legendary Lon Haldeman (& Susan Notorangelo) on his blog page. He outlines 13 steps to breaking in a Brooks (or similar leather) saddle. The whole process takes about three to four days. This technique does not work with leather saddles that have a fabric or mesh-like backing on the underside like the Rivet and others. This extra layer is presumably designed to prevent the leather from sagging over time, but it is just too firm and doesn’t permit the leather to shape or become softer. Below is an abbreviated version of his 13 steps. WARNING: light colored leathers may develop some streaks or odd looking patterns when attempting this step.

  1. (optional) Before treating this saddle I wanted to minimize any chafing and skived the edges of the leather with an Exacto blade or scalpel.
  2. Attach your saddle to your seatpost and dial in your bike fit with your preferred height, setback and overall saddle angle. Mark with tape the height of the post.
  3. Remove the saddle and post together as one unit. Immerse the whole saddle in a bucket of hot water (100-120F or ~43C or as hot as possible and still be able to immerse your hand in it) for around 7 minutes. Remove the saddle and flex the sides of it with your fingers. Lon says “The saddle should feel pliable but not limp. If the saddle still feels stiff then soak it another 5 minutes. Do not over soak it because you only want to break in the saddle about 50% during this first process.”
  4. Remove the saddle from the water and quickly dry it off with an old towel. Rub the top, bottom and edges of the leather with plenty of mink oil. Massage it into the leather for about 3–5 minutes, particularly in the sit bone area. Do not wipe off the mink oil. Mount the saddle on your bike and immediately go for a 10–15 minute ride. Using old shorts are recommended. Personally, I like to use a pair of unpadded Lycra running shorts so my sit bones protrude better.
  5. After your ride, add more mink oil to the top. Check the tension screw of the saddle. Usually I back it off all the way and then re-tighten it until it just begins to be sung…and then turn it another full revolution. Frequently I will tightly wrapped a strap around the entire saddle and post, like the ski strap shown below, to keep the shape of the saddle. This especially helps keep the side panels in without lacing. Let it sit overnight.
  6. The next day, if it still feels too firm, repeat steps 3 & 4 if necessary and go for an hour ride (on one occasion I went for a 4-hour ride, which proved to be too much for the Brooks Team Pro).
  7. Add more mink oil each day and go for increasing longer rides for the next two days. Be sure to keep the saddle well oiled for the first month or so after breaking it in.

For me, within three days I was off and running with a new leather saddle that gave me plenty of comfort without the tireless break-in time that is commonly associated with this style of seat. I was able to ride a one-day 200K (125 miles) immediately without any problems down under. NICE!

How to Pick a Chamois Short

This past week I got in a pair of Origin 8 TechSport cycling shorts to review. This is the in-house brand (i.e. cheap) of J&B Importers, one of my main cycling suppliers.
First I did a 2-hour training ride, then a 3+ training ride, and finally on June the 25th, I did an 8-hour 200K ride (125 mile, self-supported “permanent”). In all cases I was using a rather new unpadded Gilles Berthoud leather saddle, which, with each ride, was feeling more broken in (I pre-softened it using tons of Mink oil). On the 200K it felt very comfortable with no apparent chafing or sit bone pressure.
As a taller-than-average person (6′ 4″), my biggest worry is that the inseam would be too short. A pair of Airius bibs (another J&B brand) I purchased previously fit like a ladies garment — way too short for a guy, especially a tall guy. The length of the TechSport short was fine and actually appeared to provide just a little more coverage than my 9″ Craft Active Shorts (which, by the way, they feature a stretchy chamois in every model they offer). The fit of the waist seemed comfortable. The “large” size fit my 35-inch waist fine. It has perhaps a slightly looser fit, compared to my Craft shorts or bibs, but felt similar to the fit of Canari products I have. The chamois appeared adequate in size, or perhaps a little on the large size, which is fine, as I am using a wider-than-average saddle. For the shorter rides, the TechSport was very comfortable and I experienced no issues. For my 200K ride I used Lantiseptic Skin Protectant for my chamois creme, applying it to both my skin and a little to the chamois. On  this ride, it felt comfortable all day, until I got home. I had a large abrasion rash on my right-hand side sit bone area. It was about 4 x 6 cm in size. My right side is an “area” where I have known problems, and, for whatever reason, is always more sensitive — but I have never had such sizable rash there before.

After comparing the chamois found on my Craft shorts (& bibs), I discovered what appears to be perhaps a design flaw of this generic “Made in China” product: the fold points or “scores” in the chamois are poorly placed. Look at the photo of both shorts. I have drawn a line where there SHOULD be another crease in the chamois of the TechSport. I believe those wrinkles chafed my skin during this all-day ride.

The true test will come later next week, when I do yet another long ride, using same saddle, but using a different pair of bibs. UPDATE: 3 days later, I did another (solo, self-supported) 200K with the same bike, saddle and chamois creme, but wearing a pair of Craft bibs — big difference with no chafing whatsoever,  just some very minor redness.

CONCLUSION: I cannot recommend this product for long endurance rides, but it might perhaps be OK for shorter training rides only.

So when looking at any prospective chamois shorts or bibs, hold them in curved shape, as if it was on your body, and view the positioning or shape of the wrinkles, if any!