My Sigma 1606L at the end of 4 days on ”Last Chance.“ Thats a lot of miles for one ride!
Calibrate your bike computer (or cyclocomputer) so it is accurate—unless you have a GPS-based model. On my first brevet, my computer was so far off, that it was a major factor in my DNF (darkness, rain, sleet and a tiny bit of snow didn’t help either). To calibrate it you must know how to change the wheel size in the computer. Not all wheels are the exact same circumference. A 700 x 25c tire between brands can vary enough that during a 125-mile brevet you might be a mile or two off at the end of the day. Use a GPS to calibrate. Borrow one from a friend if you need to. I have a Garmin designed for hiking and generally don’t use it for cycling (too heavy & eats batteries like crazy). Don’t use an automobile odometer—they are all over the map.
Here’s how: Zero out the mileage on the computer & GPS. If necessary, put the GPS in your back pocket so it gets a clear shot of the sky for accuracy. Ride for 4 or 5 miles and compare the two. If the bike computer reads high, then you need to reduce the wheel size. Or visa-versa. Then ride several more miles and check it again. It may take several calibration attempts. It is simply trial and error. Finally, ride for 10–20 miles and check. I try to get mine to read within 0.1 mile accuracy for a 15 mile distance.
Don’t do this in mountainous terrain or a steep climb as some GPS models have trouble there. I have found that with my Sigma computer, I use 2110mm for Maxxis 700 x 25 ReFuse tires and 2113mm for Conti. 700 x 25 Gatorskins.
I really like Lezyne products. Their use of extension use aluminum (instead of plastic) and CNC machining is wonderful. I also think the aesthetics of their round symmetrical design on their products, including their lights. I prefer their mini-pumps to the Topeak models as it is more durable.
But, buyer beware, their screw-on pump chucks can be problematic with certain types of Presta valves or stems. Last year, while at an overnight stop on a tough 600K brevet in Southern Utah, my cycling partner only had the Lezyne CNC Travel Drive floor pump which had a thread-on chuck. The Presta valves in all my Kenda tubes are removable. Because of that, after topping off my tire, upon removing it, the valve came out, letting all the air out of the tire. After several panic-striken attempts, we finally found a pair of pliers and tightened down the valve and were finally able to fill my tire.
The same problem applies to their portable hand or frame pumps. I upgraded my Micro Floor Drive HP (shown in the lower left with the gold end) with their ABS (Air Bleed System) pump head, as this pump was unusable without it. This unit now comes standard with the ABS.
Yesterday, while on a solo 200K (127-mile) training ride, my front tire was suffering from a slow leak. I was on a different bike than I normally use for long distance riding, and had mounted on it a Lezyne Pressure Drive CFH mini frame pump. It is both a mini-pump and a CO2 inflator combined. After repeated tries using this pump, I finally gave up. Fortunately, I also had my my trusty Lezyne Trigger Speed Drive CO2 and was able to fill my tire up enough to finish my ride. The Speed Drive CO2 has a press-fit chuck end and NOT the threaded style…thank goodness.
Also shown in the photo (just left of the Presta valve) is my my off-brand floor pump hose end, which has been upgraded with the Lezyne Dual Valve Head which has a press-fit non-threaded chuck. It works great on all Presta and Schrader valves.
Summary: If your Presta valves are removable, don’t buy any Lezyne pump or CO2 inflator with a threaded chuck end unless it comes with ABS (pressure relief valve). Lezyne, in their product literature, suggests using LOC-TITE to secure removable Presta valves, but seriously, who has time for that?
I have searched for some time now for an inexpensive training tire that had a high TPI count (threads per inch) with a dual compound. CST, a major OEM tire manufacturer (reportedly, one of the biggest in the world), introduced a foldable model called the Recourse C1808. The folding model is only available as a 700 x 25mm tire (ETRO 25-622), which is my preferred size anyway. It has a 120 TPI casing with their so-called EPS puncture protection. Most tires in this price range have a 30 or 60 thread count. Recently, while on a very rainy ride, I had a huge thorn (goathead) stick in this tire. I removed it and just kept on riding without a puncture! The listed weight is 205 grams. After installing onto my DT Swiss 1450 rims, it actually measured slightly larger volume than the Continental 4000 S 25mm tire. (Some other 25mm CST tires, like their popular Czar, measured in much smaller than the Recourse). Please note that this tire is also available with a single compound with a wire bead for much less.
August 2016 update: My daughter had a side-wall gash when using the above tire, after low mileage. Hmmm. Another option, in this same price range, is the CST Conquistare tire with a folding bead. It is only 60 TPI though which is great for commuting, but for those looking for a high thread-count performance tire, it may not cut it.
The list price on these CST tires is around $38, about half of a Continental 4000 S II, which is my “go to” tire for events. The CST tires are made in China and is available through my site eoGEAR as a special order item.
This brand is the worst. A14 foot bag should be 14 feet long. It’s about 4 inches short. Two years ago I bought another of their bags and it was about 6 inches short so I exchanged it for this one which is still short and barely fits the board. without cramming it into the bag.
Last year I took and built up a Seven titanium bike and used it on a 1200K grand randonnée. I just about died because of butt soreness in the last two days of this four day event (see this post).
Consequently, I have purchased this new so-called suspension seatpost from Specialized (it’s nickname is the cobbler gobbler). It has made an incredible difference. Even on a short 50 mile ride where I’m in the aero bars a lot I can feel the difference in the buzz of the road. It has kept me from selling or retiring this double-butted titanium frame.
I highly recommend it for those that are suffering with saddlesore issues or other butt comfort problems.
The single mounting screw is very fast to adjust as one screw adjusts fore/aft distance and the angle (the easiest to install and adjust of any of the saddle posts I have used). But the only caveat with this post is that because the adjustment screw is on the side of the post, some suspended leather saddles may not work as the side apron of the saddle covers up the adjustment/mounting screw. My Gilles Berthoud touring saddle (Aravis) has been trimmed back a little so I am barely able to access the allen screw. My guess is that the Brooks Team Pro or B-17 would prevent access.
This summer (2014), it served me well and was comfortable on CHC1200 with the same saddle and wheelset as my difficult 2013 1200K.
I do not sell these on my website. This item is only available in 27.2 mm diameter post.
Day 3 of 2008 Last Chance (my first completion of a 1200K or 750 mile brevet). 12 hours of constant rain and 45-50F temps. (Click or double-click for larger image)
Brief overview of gear used for rainy rides + other gear notes. Nearly all of these items are gear which I have tested first, and then posted on my online gear site: eoGEAR.
Shower cap on helmet. I now use a commercial one and cut a slit for my headlamp.
Goretex style jacket (i.e waterproof breathable). Look for something that is factory seam sealed. A wind jacket is not enough for constant, cold rain. (2010 update: I now use and really like the ultra compact bright-colored fluorescent lime-green Craft Performance Rain Jacket. It is amazing as it breathes quite well for one providing such remarkable rain protection).
Neoprene gloves. Designed for scuba diving and 3mm thick. Perfect for terribly days like this.
Rainlegs. Keeps rain over your lower body. Super lightweight and worth their weight in gold. Keeps you warmer too.
Grocery sacks on my shoes to keep rain out. Despite using Merino wool socks, I still got cold feet. I now pack neoprene cycling toe warmers if the weather looks bad or a pair of Craft rain booties that cover my entire shoe. For one recent long rainy ride (2013 Gold Rush 1200K), I did use thin neoprene socks (instead of over booties or toe warmers) and while they kept my feet warm, they seemed spongy and I felt I was loosing power to the pedals.
Aerobars. I think I’ll write an entire article why I like them, especially the Syntace C2 or C3 Clip Ons. Super thin and lighter than most carbon fiber models.
Vinyl cue sheet holder. Custom made and attached to the aerobars (can’t see in photo). A godsend for memory deprived people like me.
Top tube bag (just behind the bars). This enables me to eat on the fly. With layers of clothing including a reflective vest, it is hard to get out of your rear jersey pockets. Oh, that is my design, the eoGEAR Top Tube Brevet Bag.
Pump. A mini-floor pump with a hose. No hose, no pressure. You can place the base of this on the ground and apply body weight. This is simply no way to get 120 PSI from one without a hose. I use the Topeak Mini Morph with Gauge. Lezyne makes some good models too.
Saddle. Unpadded suspension leather style. Selle An-Atomica. I DNFed on my first 1200 attempt because of saddle sore issues.
Rear seat post bag. Big enough for extra clothes, after the weather turns warm. Detours High Tail EXP UL was my favorite for 400K + rides. I now make my line of bags called the eoGEAR RandoBags.
Tires. Maxxis Refuse 25s (700 x 25c). Softer ride than 23s. Besides, I’m 6-4 and with that height I pack more weight than the average 5-10 rider. I inflate the front to 110 PSI and the rear to 110 or perhaps 115 max. (2012 update: Continental Grand Prix 4000 S or the 4-Season are my new preferred tires).
Gearing. Compact double chainring (front). I use a special French-made 33 ring in the front (instead of the stock 34) for more climbing power when tired. Combine that with a 10-speed 12-27 cassette (shown) and you are in pretty good shape. I plan to upgrade to a 11-28 or 12-28 when that one wears out. That new combination will give me the equivalent of a triple in front and a 12-25 in the back. (2012 update: Shimano 12/30 cassette,10 speed is now in use.)
Oh the bike! Yeah, a stock frame with pretty traditional racing geometry. Low end model with a blend of carbon fiber and aluminum (joints). 61cm. Head tube too short for me. Still shopping for something better. 20 or 21 lbs. without extras. Fezzari CR2. Manufacture direct pricing. (Since then I have purchased a Rocky Mountain carbon and a second-hand Seven Ti road bikes).
What have I missed? Shoes and pedals? I used stock racing-type pedals and shoes that season, but I have switched to something better for rando rides. More to come later on that. When I get time—if I get time!
The new Sigma ROX 10 bike computer. Their first GPS-based model.
For the past several years, I have used Sigma analog “magnet wheel style” computers for some time now and like their large easy-to-read screens and overall design. Late last year, Sigma, the German company, released their first-ever GPS based cyclocomputer. They are offering the same computer body with two packaged versions. One version, the “Basic” package is the bare-boned package with no heart rate monitor, cadence sensor or wheel speed transmitter. Since it is GPS based I see no reason to also have a wheel speed transmitter. Also, since I already had two Garmin ANT+ heart rate chest transmitters, I opted for the “Basic” kit, instead of the more deluxe “Set” package.
For a similar price of the Garmin 200 or 500-series units, you get a lot more with the ROX 10.0. For that reason alone, I highly recommend this model. What you gain is the ability to upload previously created (or cycled) maps (i.e. GPX files made in RidewithGPS, Strava or Map My Ride). The maps on the ROX only show a reference line where you need to go and do not show surrounding streets or geographic features like the Garmin 800-series, but that is better than no map at all, as is the case with the Garmin 500.
User Tips
Chest Strap Syncing. For me, the manual (pg. 40) was confusing on how to sync the computer head to a chest strap heart rate transmitter. Here’s how, with the strap nearby the ROX: go to Settings > Bike 1–3 & Totals > ANT+ Pairing > Heart Rate 1.
Short Menu I missed this in the manual, but while on the primary “Training” screen, press both the upper buttons (Back & Enter) to quickly get to the “Short Menu,” which has several useful items like favorites (preferences for differing screen settings), elevation settings and uploading a previously created route or track.
Auto Pause I have found that I don’t enable the Auto Pause function as I like to separate moving time from total time. Page 23 says “Note: The exercise time is linked to the logging. If the exercise time is stopped, no data is recorded for further analysis. If the auto pause function is activated, the exercise time is identical to the trip time. If the auto pause function is deactivated, the trip time and the exercise time differ.
Backlight I have found that this light uses up a minimal amount of power, so lately (November 2015), I have it set to not turn off automatically after 10 or 30 seconds. I ran a test by leaving the light on for the duration of an 8-hour ride and the battery was depleted by 50%, which is about the same depletion I normally get with the light off the whole time.
Important Routes Note I currently create all my routes in Ride with GPS and then export them as a GPX file to my computer. From there they can be imported into the ROX using the Sigma Data Center software app. On a recent long ride, after downloading (or is it an “upload”?) my route, I checked to see if it “made it” onto the ROX via the Short Menu (see below) > Load Track > Stored Tracks. It showed up with the correct mileage displayed. But on the morning of the ride, the ROX constantly said I was off route. Upon further review (Short Menu > Load Track > Stored Tracks > Select “My Route” > Show Track, it displayed no map, despite indicating the correct mileage. Apparently I exported the wrong type of GPX from RWGPS, or the file was corrupt. Later, at home, I re-exported the route and it worked fine. So word to the wise…always double-check by viewing your route map on the ROX to insure it is properly uploaded.
Elevation Calibration As far as I can find, there is no auto elevation calibration. So at the beginning of every ride that is not near my known home elevation, I have found I need to go to Short Menu > Altitude > Manual Calibration and reset the elevation, otherwise, all day long, the elevation is reading as if I started it at my home elevation.
Preferences Perhaps one of my favorite features is the preference screen settings, which can be set up on my PC (Mac actually) and then later uploaded. With my Garmin fenix it can only be done on the tiny unit itself, taking hours because of the various disciplines or profiles (swimming, cycling, mountaineering, SUP etc.). I finally wrote them all down in a notebook before I sent the unit in for warranty replacement.
Software The packages do not included a software CD, instead they give you a license key (inside the box) to download it to your PC or Mac. My initial key didn’t work right, but Sigma’s great U.S.-based customer service quickly provided another that did work.
Below are Some Questions
or comments I sent to their tech support person regarding this product, along with their answer.
Q: You said “Anytime you come within 30m of that point it should recalibrate to your preset number.” What point? How does one set waypoints with this device? On pg. 26 of the manual it says “You can also mark special points of interest (POI) located near the route as waypoints.” Does that mean in RidewGPS after I mark POIs and the ROX will beep when I approach it? Or can I do create waypoints with the ROX as I travel?
A: POI is different from the Altitude points list. POI’s can be added to route that you then transfer to the ROX computer. The altitude points list you have to create on the ride at the location. Here is how you set that while on a ride: you have to be getting the GPS signal and then follow the steps to get into the short cut menu/altitude scroll to the bottom (Manual Calib) press enter, press enter, then using the -/+ buttons change the character/number that is selected then press enter to go to the next and repeat until you have set the elevation then press back/back/back and you should be at the training screen.
Q: If I’m doing a continuous 24-36-hour ultra event, do I want to set the Log Interval to 5 or 10 seconds, so I don’t max out the memory of the ROX? I will be using an external USB battery pack to keep it going for that long.
A: With the log memory empty at the start of the event you should get approximately 41 hours at 5 seconds and 82 hours at 10 second intervals. When you dock the computer with your MAC in the dashboard display in the upper left you will see LOG and below that it tells you how much memory is left depending on the interval selected.
Q: In tracking mode, what is the top of the screen oriented to? With my fenix, I can set it so the top is the direction of travel OR just north. I keep it in the direction of travel. It seems the ROX bounces around a lot when holding it in my hand. Is there a setting for this?
A (Short Answer): Short Menu (see top of page) > Track Settings > Track Direction. (But not found under Settings where one would think it would be.)
Long Answer: When you are in the track view or the altitude view you can change the options on the top of the display. Go to the device settings in the data center and go to favorites A (and or B) and open that drop down, there you will see the different views and the options available. Direction is one of the options but you can select up to six for track view and altitude view.
Q: After creating a route in RidewGPS or elsewhere and after exporting as a GPX file, can I just copy it onto the ROX w/o opening the Data Center and saving it there first? (seems like an extra step) With the fenix, the icon of the device shows up on my desktop (iMac) and I see the native files etc. that are on the device, whereas the ROX it doesn’t show up as a device on my computer, which is kinda weird as I thought all external devices that are attached show up.
A: No you will have to import the .GPX file into the data center first then export it to the ROX computer.
Q: I don’t have a power meter on my bike, so are the power settings (including power to weight ratio) not relevant or does the ROX provide a guestimate of those anyway?
A: The ROX computer has what they call Perceived Power, it is an algorithm that will use the user data that you enter then it calculates what it perceives is the power that it should take to do what you are doing. It is not the same as using a strain gauge power meter.
Q: With the Sigma PC15 (fitness watch) it gave me wonderful heart rate info, giving me time percentages of time in each of three zones. That was most helpful in training and for post-workout analysis. On page 32 of the manual it shows time at various intensities (but not percentage, a bummer), but I don’t see that data on Sigma Training Center. I know it shows on the ROX under Memory > Stored Tours. I am missing that info on the Data Center?
A: The HR % are shown in the data center, you can display the target zone, intensity zones, or the power zones. But while you are riding you can set it to intensity zones or you target zone and that will show % of max and it will show if you are below, in, or above your chosen zone.
Q: It appears that the stopwatch doesn’t work in the background…i.e. in an ultra event, I want to get a total time, after all the breaks and stops including those times when the ROX is turned off…but I guess that is not possible. Too bad. My Sigma 1609 (older non-GPS model) had such a feature.
A: You are correct. As soon as you leave the stopwatch display is resets it to 0.
Q: With the ROX 10, the “Trip Time” is actually the time moving or the time “exercising,” whereas my exercise or moving time is the ROX’s “Total Elapsed” time of the event. Those seem to be reversed!
A: Exercise time is the total time from when you hit start until you press stop and trip time it the time you are moving. But if you have auto pause turned on they will be the same time.
Q: For ultra long events, an external battery pack can be plugged into the Micro-USB port and the computer battery can be topped off while cycling. The only problem I see is that for a 1200km event (90 hours) the unit may run out of memory, and unlike my Garmin fenix, there is no way to wirelessly via WiFi, upload part of route to my iPhone. (For a 90-hour 1200km ride, I would have to set this to once every 30 seconds, which gives chops off any sharp turns, but on the straights or with wide turns, it is basically OK).
A: You will have to change the log interval from the ROX computer under device settings.
Q: The twist lock attachment is not secure. Because the body of the 10.0 is larger than previous Sigma models, when one pushes any of the four side buttons, the whole unit tends to rotate (nearly falling off the bike). I finally slapped some electrical tape inside the mount, to tighten things up more. I noticed that some reviewers on Amazon or elsewhere had the same problem.
A: There will be a new mount and out front mount just for the ROX 10 but we have not heard a date when that will be showing up. I did see a prototype last week and it really did hold it nice and tight. I will write myself note to get one out to you when we get them. I will forward your comment on to the developers and see where that goes. Thanks for the input.
Q: The lap button only works when moving. On today’s ride, twice, I got to the top of a hill climb, unclipped, then quickly hit “Lap” but it didn’t take it. Consequently, I didn’t get a record of the time interval for that lap. (Perhaps Strava may have it as a segment, but I won’t know my time until I get back to the office to upload).
A: Will pass comment on to engineers.
Q: Yesterday, I took the ROX 10 on a short backcountry ski trip, along with my Garmin fenix (wrist watch tri model) to compare. Regretfully, both units recording erroneously high heart rates, which seems to be a chronic problem with ANT+ chest straps. I confirmed this with them at the recent Interbike show and they sent me a freebie “newest, latest” Garmin chest strap. It was worse than the old one…mostly due to wind issues while cycling, but today, while skiing, why? Hmmmm. I guess this is your first ANT+ venture. Have you heard any reports that your chest strap also gives bad readings for cyclists (mostly in summer when wearing one single jersey)? (My conclusion: same problem as with all Garmin devices).
A: Did you try moistening the chest belt contacts when you put the chest belt on? Its cold and dry air so that might help with the connectivity, maybe a cardio gel. But Garmin owns ANT+ so my guess is it’s all the same. I have heard of issues with cycling and HR’s, with a looser fitting jersey that if it starts to flop around it can create a static discharge and that will interfere with the HR signal. I had a customer out is California and he was having issues with his HR chest belt so what he tried was he mixed some sort of fabric de-static stuff for the laundry and mixed it with some water and put it into a spray bottle. Before a ride he sprays the front of his jersey and that seemed to work for him. And I bet it smells fresh on the rides. That was years ago and he still stays in touch so I assume it is still working.
Q: How does the unit get firmware updates? The manual refers to this, but gives no clues on how it is done.
A: When you dock the ROX computer the data center checks for FW updates, for better or worse that’s how they set it up.
The Firmware updates are done through the Data Center (PC or Mac software). After you open the Data Center software wake up your ROX 10.0 computer then dock it with the USB cable, while in the DC dashboard view if there are any Firmware updates you will see a window between connected device and statistics in the main display. It there are any updates listed, to the right you will see a green button that says start update, click on that green button and from there you will get a screen(s) with the instructions for installing the updates. BUT before you do any updates make sure you have downloaded any data off the ROX computer, the new FW will wipe all the previous data off the computer. This includes any training data, total device values, and your device settings. Once the new FW updates have been installed then you can push the device settings back onto the ROX computer from the Data Center.
Q: How do I delete tracks (routes created, but not ridden yet) on the ROX? (Not being able to delete them in the field seems to a big oversight).
A: They can only be deleted by using the Sigma Data Center (desktop) computer application. Plug in the ROX to your computer and then click on the “Track Synchronization” icon on the upper-right corner of the screen of the Data Center screen. Follow the logical steps from there.
Q: On the ROX unit itself, there is a “Memory” function. What memory does it refer?
A: The internal memory % is the amount of memory that is taken up by your rides that you have saved, but not the tracks you have uploaded to the ROX, they are separate.
Q: So if “internal memory” is only for rides I have done, how do I asses memory allocation of uploaded tracks or routes (which I have yet to ride)?
A: There is no way to check that memory; I don’t think it takes up very much memory as it’s just the GPS coordinates. But it would be a nice addition; I will mention it to the developers.
Summary
All-in-all I am happy with the ROX 10, especially considering the price point.
My biggest complaints are:
Inability to upload results directly to Strava. One must upload to the Sigma Data Center on a PC first and then to Strava.
Inability to upload results via a mobile device or directly online. When I travel, I generally do so with an iPhone and a iPad as I don’t own a laptop. But I like to upload my rides to Strava immediately after I complete them. But I can’t, until I arrive back home, because the Sigma Data Center software must be loaded (& this is only available through a serialized edition) onto a laptop or desktop computer — they don’t have a online, browser-only upload utility. (This problem is solved with the ROX 11 as it has Bluetooth).
I wish the stopwatch function would work in the background of an activity, so at the end of an ride, I can tell what my total time was, including breaks and stops. Better yet, I wish the “Trip Time” recorded the total time, from the start the unit started recording to when an activity was saved, regardless of how many times the unit is paused or turned off to save battery life.
Battery light buttons are difficult to use. The backlight is enabled by pressing the bottom two side buttons. But nearly every time, I end up pressing one button slightly before the other and invariably I click the lap button instead.
I like that there are no touch screen modes as that is a hassle with gloved hands. But on the other hand (pun intended), I don’t care much for the soft rubber buttons as with gloved hands, it is difficult to use.
I have a local friend that, after about three years, the tabs on the bottom of the ROX 10 are worn out and no longer can mount to a bicycle. That is not a replaceable part. Sigma offered a discount on a new unit. The new ROX 11 has deeper tabs and use the Garmin mount system.
Screen shot of my preferences for the ROX 10. Note the Auto Pause is OFF (see text for the reason).Screen shot of my preferences for the ROX 10.
After many months of not using my spin bike, today I was forced to because of a shoulder injury. 30 minutes into my work out one of the brake pads flew off (after increasing the resistance on the main wheel). It turns out the brake pads are merely glued to a plastic housing. How cheap can you get? Can you imagine if on a real bicycle, the pads were only glued instead of set inside a recessed housing?
The brand is Sunlite, also sold under the Forza label.
I already had many troubles early on as it was not tall enough to support my six-foot four frame. Consequently I had to have a local machinist drill out new holes to get to seat post high enough and to get the handlebars where I needed them.
Also, early on, I had issues with the brake pads as they squealed, and, unlike a real bike brake system, there was no way to adjust them into a “toe in” mode. I ended up taking electrical tape and creating a shim to get the preferred toe in position, thus eliminating the noise.
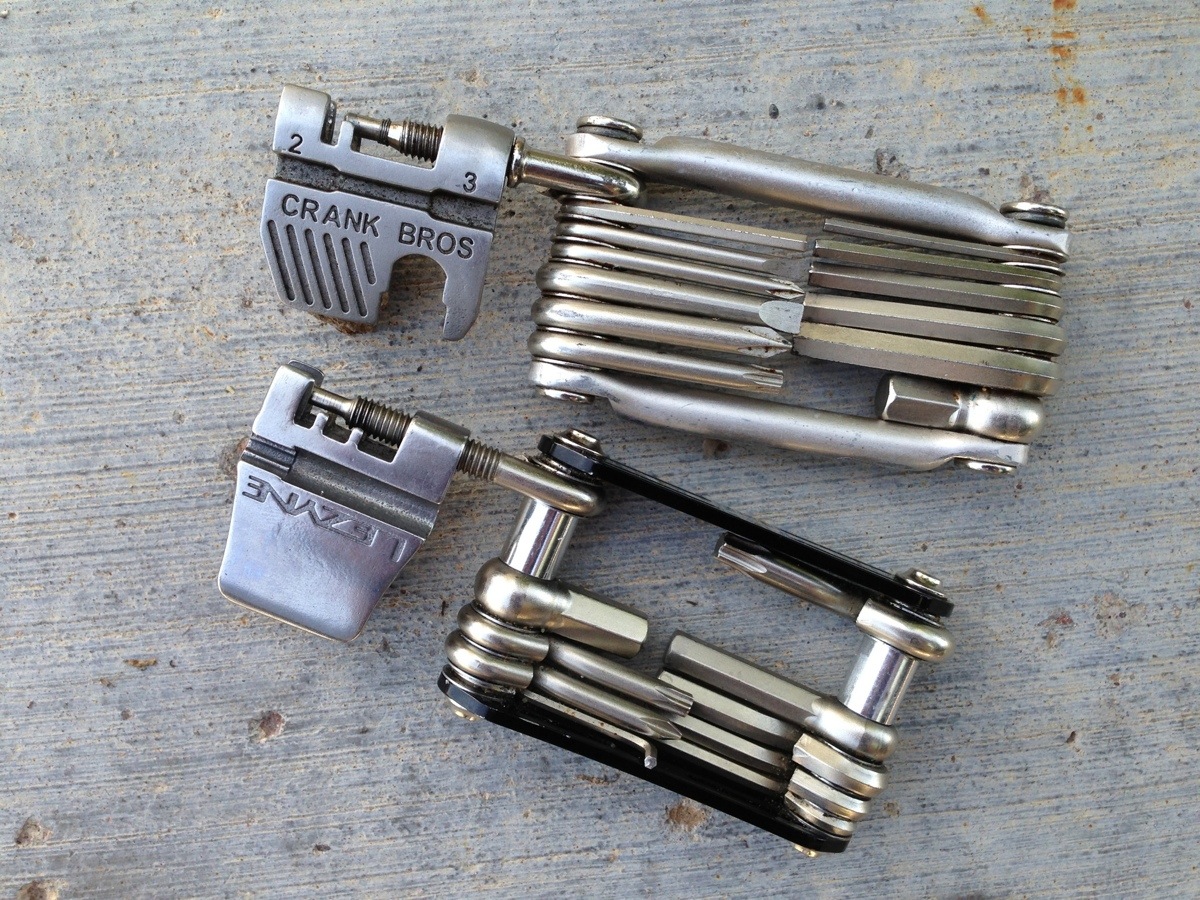
Recently while on a 200K ride, one of my friends had a mechanical where his chain got twisted. I had spare links but for the life of me could not remove the old ones because of the tool which I had. It was a Crank Brothers multi tool. The problem is that the chain tool pin did not thread in far enough, as you can see by these photos, and consequently it would not push the old pin completely out of the chain. We finally borrowed a pair of pliers from a nearby neighbor so we can take out the old pin and straighten the chain. Had we been on the country farm, some three miles earlier, we have been fat out of luck as there were no residences nearby.
Word to the wise: buy a Leyzne, not a Crank Bros multi tool.
In April of 2010 I purchased a new carbon fiber bicycle, a Rocky Mountain Prestige 70 CR. I had previously owned bike which was made from hybrid materials — part aluminum and part carbon and was looking for something with a better ride. This new frame was 100% HM Monocoque Carbon with other carbon components like a carbon fork (with a carbon steerer tube) and carbon cranks. The handlebars were alloy, which I prefer anyway. Rocky Mountain (based in Canada) is most noted for their mountain bikes, but they also carry a small line of road bikes too.
After two years of hard riding, this frame developed some hairline fractures (report here) and I consequently got a new frame under warranty. Because of this problem I decided to look at getting a titanium frame as they are more durable. During the summer of 2012 I found a used Seven Ti frame (Axiom SL). The geometry was just right for me with a 61cm top tube (1 cm longer than my carbon bike). I was hoping this would be my new long distance bike as Ti frames supposedly never wear out. Later that fall (due to the delays in manufacturing at Zinn), I built it up with new handlebars, new seatpost, saddle, custom 190mm extra long cranks from Zinn and new Shimano drive train & derailleur.
To make a long story short, in June of 2013 I finished my “long ride of the season,” a 1200km (750 miles in 3.5 days) brevet, called The Gold Rush, in northern California. My butt suffered big time, like my early days of cycling, before I converted to suspended leather saddles. But I was using a suspended leather saddle! During 2012 I used my carbon fiber bike (with an alloy seatpost) with the same saddle and wheelset which I used on Gold Rush and had zero saddle issues. Some two weeks after Gold Rush, I had a 600km, in which I switched back to my carbon bike and once again, had no problems. The following year I added a Specialized CG-R seatpost to this Ti frame and had a much better experience, i.e. less butt pain using this Ti frame on a 1200K. See this post for more info.
My conclusion: My carbon fiber frame yields a more comfortable ride than my double-butted Ti frame. Are all carbon frames similar? The Rocky Mountain Prestige is an average, run-of-the-mill Chinese-made model ($3,000 MSRP including a $600 Ksyrium Elite wheelset which I only use for training rides). Could the longer cranks on the Ti frame be causing me butt pain?
Possible solutions? Add a carbon fiber seatpost to the Ti bike? Or a suspension seatpost (urrgh, the extra weight)?
Specs — 2009 Rocky Mountain Prestige 70 CR / 2000 Seven Axiom SL
Frame sizes (seat tube length, cm): 60 / 61.5
Horizontal tube tube (cm): 60 / 61
Head angle (degrees): 73 / 74
Seat angle (degrees): 72.5 / 72.5
Head tube length (each has 30-40mm extra height with spacers, cm): 23 / 20.5
Wheelbase (distance between axles, cm): 101.5 / 102.0
Chainstay length (cm): 41.8 / 41.3
Fork rake (mm): 45 / 41 (frame was designed around a 40mm rake, I am using a Alpha Q carbon fork on the Seven)
Wheelset: DT Swiss 1450 alloy with Continental 4000 S 700 x 25c tires inflated to about 100 PSI
Saddle: Gilles Berthoud Aravis suspended leather with Ti rails
Pedals: Shimano A520 / Shimano A600 road touring pedals
Aerobars: Syntace C2 / Syntace C3 mounted to alloy 44cm wide bars
Cranks (mm): 175 FSA carbon fiber / 190 Zinn