Richard Stum’s randonneur cycling, rando skiing & SUP site. @rando_richard
Author: Rando Richard
I’m an old guy (age 69 in 2023) who enjoys aerobic, endurance sports. I call myself a cardio-junkie. Perhaps the more appropriate term would be “ultra” endurance sports. Since I was a teenager I have always enjoyed “slow twitch” outdoor sports like backpacking, ice climbing, running, mountaineering, hiking, alpine skiing and randonnée skiing (alpine touring, backcountry skiing or skimo). In 2005 I starting running with more regularity — except this time it was not for the intent of getting ready for a mountaineering trip, but as an end to itself. From 2005 to 2007 I managed to eek out two seasons of ultramarathons — that is competitive trail runs up to 50 or 100 miles. Due to a nagging ankle injury from the 80s (an accident while ice climbing in the 1980s where my lower tib and fib were badly broken), I had to cease that grueling, but rewarding activity. I then migrated into ultra distance road cycling or randonneuring. The rides are called brevets (pronounced bruh-VAY, it’s French) and are minimally supported — they are similar to ultrarunning and backpacking where one must be self reliant. Although brevets are non-competitive, they do have have cut off times to qualify as a finisher. They are usually are done in groups, which can have a competitive slant to them. Today, I continue to participate in long distance cycling including some ultra-racing, randonnée skiing (a blend of cross country and downhill disciplines) and still get out on an occasional mountaineering trip.
Since 1996 I have been designing, manufacturing and selling camera bags. That is Kinesis Photo Gear (kgear.com). In 2005 I started selling cycling bags under the Kinesis label and eventually expanded it to including other sports like SUP (stand-up paddle boarding and some skimo). Consequently, it become eoGEAR — the “eo” stands for endurance outdoor.
My wife and I are empty-nesters now and we live and work out in the boondocks of central Utah, half way between Salt Lake City (great powder) and Moab (great red rocks).
Well, I guess that is all for now. Safe travels mate! Perhaps I’ll see you on the road or trail.
— Richard Stum
For several weeks now I have attempted to get my average speed on a paddleboard past 4.9 mph. today I finally broke that barrier and hit an average of 5.0. Oddly enough I did it at elevation at around 8500 feet on Electric Lake, In the mountains high above my house. This average is based on a 30 minute out and back time trial effort.
In April of 2010 I purchased a new carbon fiber bicycle, a Rocky Mountain Prestige 70 CR. I had previously owned bike which was made from hybrid materials — part aluminum and part carbon and was looking for something with a better ride. This new frame was 100% HM Monocoque Carbon with other carbon components like a carbon fork (with a carbon steerer tube) and carbon cranks. The handlebars were alloy, which I prefer anyway. Rocky Mountain (based in Canada) is most noted for their mountain bikes, but they also carry a small line of road bikes too.
After two years of hard riding, this frame developed some hairline fractures (report here) and I consequently got a new frame under warranty. Because of this problem I decided to look at getting a titanium frame as they are more durable. During the summer of 2012 I found a used Seven Ti frame (Axiom SL). The geometry was just right for me with a 61cm top tube (1 cm longer than my carbon bike). I was hoping this would be my new long distance bike as Ti frames supposedly never wear out. Later that fall (due to the delays in manufacturing at Zinn), I built it up with new handlebars, new seatpost, saddle, custom 190mm extra long cranks from Zinn and new Shimano drive train & derailleur.
To make a long story short, in June of 2013 I finished my “long ride of the season,” a 1200km (750 miles in 3.5 days) brevet, called The Gold Rush, in northern California. My butt suffered big time, like my early days of cycling, before I converted to suspended leather saddles. But I was using a suspended leather saddle! During 2012 I used my carbon fiber bike (with an alloy seatpost) with the same saddle and wheelset which I used on Gold Rush and had zero saddle issues. Some two weeks after Gold Rush, I had a 600km, in which I switched back to my carbon bike and once again, had no problems. The following year I added a Specialized CG-R seatpost to this Ti frame and had a much better experience, i.e. less butt pain using this Ti frame on a 1200K. See this post for more info.
My conclusion: My carbon fiber frame yields a more comfortable ride than my double-butted Ti frame. Are all carbon frames similar? The Rocky Mountain Prestige is an average, run-of-the-mill Chinese-made model ($3,000 MSRP including a $600 Ksyrium Elite wheelset which I only use for training rides). Could the longer cranks on the Ti frame be causing me butt pain?
Possible solutions? Add a carbon fiber seatpost to the Ti bike? Or a suspension seatpost (urrgh, the extra weight)?
Specs — 2009 Rocky Mountain Prestige 70 CR / 2000 Seven Axiom SL
Frame sizes (seat tube length, cm): 60 / 61.5
Horizontal tube tube (cm): 60 / 61
Head angle (degrees): 73 / 74
Seat angle (degrees): 72.5 / 72.5
Head tube length (each has 30-40mm extra height with spacers, cm): 23 / 20.5
Wheelbase (distance between axles, cm): 101.5 / 102.0
Chainstay length (cm): 41.8 / 41.3
Fork rake (mm): 45 / 41 (frame was designed around a 40mm rake, I am using a Alpha Q carbon fork on the Seven)
Wheelset: DT Swiss 1450 alloy with Continental 4000 S 700 x 25c tires inflated to about 100 PSI
Saddle: Gilles Berthoud Aravis suspended leather with Ti rails
Pedals: Shimano A520 / Shimano A600 road touring pedals
Aerobars: Syntace C2 / Syntace C3 mounted to alloy 44cm wide bars
Cranks (mm): 175 FSA carbon fiber / 190 Zinn
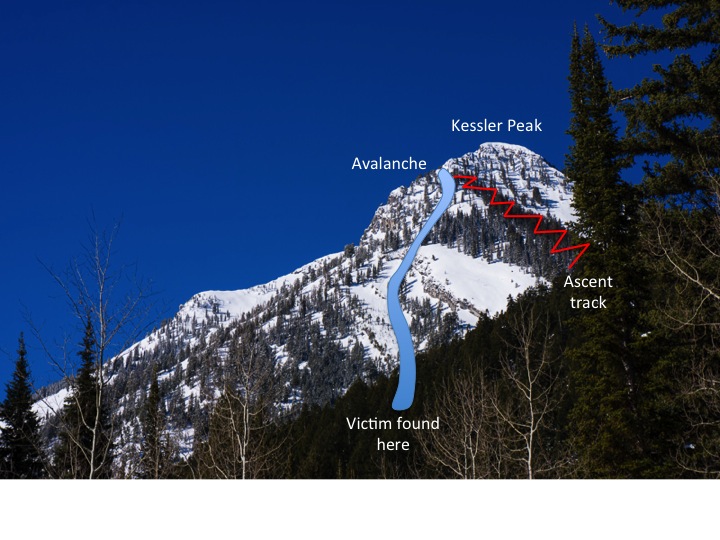
For many years, I have done my share of backcountry skiing. The thing that always concerns me while traveling near or above timberline is the constant threat of avalanches. I am a novice at forecasting avalanaches, yet, recently, an expert avalanche forecaster was tragically killed in a slide near Big Cottonwood Canyon, which is east of Salt Lake City. The victim was Craig Patterson, a forecaster for the Utah Department of Transportation Snow and Avalanche Program, which forecasts and controls avalanches for both Big Cottonwood Canyon and Little Cottonwood Canyon. Craig was doing fieldwork alone on Kessler Peak to check out the snow stability conditions, because avalanche slopes on Kessler Peak can threaten the highway below. My condolences to his family for their loss.
I love lists. It seems every time I read a magazine or online article about fitness myths, they seem to contradict each other. This one does make a lot of sense however. http://dailysavings.allyou.com/2013/04/02/fitness-myths/
Myth #1: Stretching before exercise reduces the risk of injury. False: The scientific literature of the past decade fails to support stretching before exercise as a successful strategy for injury prevention. However, research does support stretching at other times, including post-exercise, to reduce injury risk.
Myth #2: Walking a mile burns as many calories as running a mile. In our dreams: While walking is a great physical activity, it does not require as much energy as running. Research has shown that running has a 40 percent greater energy cost compared to walking . That means you burn more calories when you run.
Myth #3: Lactic acid causes acidosis and muscle fatigue during exercise. False: This century-old myth, linking lactate or lactic acid to fatigue, is the result of a scientific misinterpretation that has prevailed through the years. Lactate does not cause metabolic acidosis. Furthermore, it is useful in the performance of exercise at high intensities.
Myth #4: Lower-intensity exercise puts you in the fat-burning zone, so it’s preferable to higher-intensity exercise. Wrong: The “fat burning zone” at low intensities of exercise doesn’t even exist! The best approach is to think of energy expenditure as a calorie is a calorie is a calorie, rather than partitioning into carbohydrate and fat calories. To burn maximum calories in support of ongoing weight loss, progress to a moderate-intensity/higher-volume exercise program and include interval training.
Myth #5:Morning workouts increase metabolism better than workouts performed later in the day. Wishful thinking:Research has clearly shown that total energy expenditure is equivalent across different meal and exercise orders. Therefore, the decision to exercise in the morning should be driven by personal preference rather than any false hopes that greater weight loss will be achieved by exercising before breakfast.
Myth #6:Muscle weighs more than fat. Not true: Muscle does not weigh more than fat. A pound of muscle weighs the same as a pound of fat. The difference is their density. As we lose fat and gain muscle, weight may change very little, while body volume decreases as we become leaner.
Myth #7:Women who want to avoid looking bulky should avoid resistance training. False: Resistance training does not cause women to get bulky. In fact, it is virtually impossible for women to get as big (i.e., bulky) as men due to physiological differences, such as lower levels of testosterone.
Myth #8:Spot reduction really works, especially if you want six-pack abs.
In our dreams: Research shows that if a vigorous, high-volume,core-training program is performed, fat will be reduced in the abdominal area, but not selectively. A lean midsection requires, then, a total program of core, resistance and aerobic exercise—not just a focus on the abs.
Did any of these surprise you? What do you do to stay in shape?
Goshen Canyon with the first fall snow on Mt Nebo in the background (photo shot on a prior ride).
I’m finally catching up on some old news that I should have posted long ago….
When I first started cycling, one of longstanding goals (bucket list) was to ride a 200km (124.3 miles) brevet in under 8 hours. Most brevets I did were in small groups or solo, so drafting was not always possible. Finally, after about two years of riding, I managed to finish a few solo 200s in under eight hours. One season, I did two or three back to back 200s where my time as 8:03 or 8:04, but I usually did one or more under eight hours per season.
This past fall, about two weeks after finishing the 200-mile LoToJa race in under 12 hours (another item off the bucket list) I was riding “my monthly 200K.” I had no intention of setting any personal records, but just to finish in perhaps under eight hours. This is the link to this route, which has about 5,000 feet of climbing. As the day progressed, I noticed that the wind seemed to always be in my favor (or lack thereof) and that this ride was going rather quickly. I only stopped twice for hydration and some snacks at convenience stores. Towards the end of the day, after making the 45-minute climb up Salt Creek Canyon and as I was dropping into the town of Fountain Green, it appeared that maybe if I did keep pushing, I might get a sub 7-hour ride — something I had never done before…solo or with a group. So I mustered up all my remaining strength and for the last 40 minutes of the ride. I kept down in my aerobars and focused on keeping good form and not slowing much for nutrition and drinking. Nearly totally exhausted, I made the final slight climb up to my last turn at the light in Mount Pleasant — my timer showed I only had about 40 seconds left on the clock. I blew through the light (right turn, red light I think) and sprinted the four blocks to the Maverik c-store, which was my “finish” for this ride, punching my GPS as I passed by the store. I DID IT, leaving only six seconds to spare!
Since I rarely “race,” I find beating personal goals a means of improving my fitness. This is a prime example of such an event. I was totally spent, but took a 15 minute break before making the 400-foot climb back to my house.
The official brevet card or record of the ride.Screen shot of my GPS download. This is slightly confusing because it also includes the 5 minute ride from my house to the start of the official 200K.
I took some photographers gaffer tape and make a small awning over my tail lights which helps when someone is drafting behind me. Also, I believe that during the day, it makes the light appear a tad brighter as the sun doesn’t wash it out as easily.
Seattle Sports GloStrap
PDW Daybot USB — new in 2017 and a very good unit.
Cygolite Hotshot 150 USB — My pick for the 2018 season.
Over the years I have used many LED tail lights since I do more than my share of night riding on brevets or double-century rides. Below is quick review of many of the popular brands.
I have seen many lights that are have less than 1/2-watt output. Typically, these lights have three or more weak LEDs and although the multiple LEDs may look cute in the store, they simply don’t have the punch or visibility to motorists. I remember on a 400k ride, a friend of mine had one those off-brand 5 LED tail lights. It looked very dim. I mentioned it to him and he changed out the batteries, but to no avail. I asked him what brand it was. He wasn’t sure, but that he got it on eBay for $3 or $4. Later that season he got bumped by the mirror of a passing motorist while commuting home on his bicycle! Fortunately he was not badly injured — in fact he stayed upright and was not knocked over. Shortly after that, myself and another friend each bought him a 1/2-watt tail light.
Your safety is not worth cutting corners when it comes to lighting!
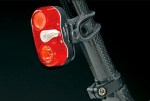
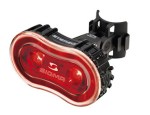
In 2013 I purchased the 2-watt Cygolite Hotshot because it has a USB rechargeable battery, which I was wanted to use on my daily training rides (I put a piece of gaffer tape on the top of it to act as an awning so it shows, even during the day). The Hotshot mounting system is a really bad design. Despite tightening to the maximum, it still drooped as shown in the photo, pointing down to the ground. So I taped it on the top, holding it parallel to the ground and then on a 50-mile ride, it just fell off (unbeknownst to me!). This light always had too many adjustable settings and was confusing. On a 600K, one of my fellow riders with a Cygolite Hotshot tail light mount also failed (while crossing some rumble strips near Zion National Park in Utah), leaving his light somewhere along the side of the road. Although I like their now-discontinued Turbo 740Xtra headlights a lot, I cannot recommend the original Cygolite Hotshot tail light.
The PrincetonTec Swerve has a great 1/2 watt lighting random flash pattern (I don’t recommend anything less than 1/2 watt). It does droop a little too (but not near as much as the Cygloite Hotshot). By using an extra 0-ring or a smaller o-ring that supplied, I have been able to stabilize this light. The switch is large and very easy to use. The claimed burn time is 24 hours for constant and 70 hours in flash mode with two AAA batteries.
The Planet Bike tail lights have reported leakage problems in heavy rain, so many cyclists mount them upside down. I have never used them and have found the lighting pattern on the Swerve and Tail Blazer to be superior anyway.
I have tested the 1/2 watt Sigma Tail Blazer. It doesn’t droop and the mount appears secure the clip on the back of the light fails very easily when attached to a bicycle frame. It has two 1/2 watt LEDs. Regretfully (June 2014), on a recent 600K ride, while crossing over some rumble strips, the clip mount on the back of the light sheared off and the light hit the deck. It didn’t shatter, but was useless as I couldn’t remount it to my seat stay, or even attach it to a bag. Although Sigma quickly sent me a new unit, the design is unchanged. The switch is flush “under the shell” button that is hard to use with gloved hands. Even with no gloves, I have had to use my fingernails to jab it “just right” to turn this on or off. At least it won’t turn on accidentally while in transport. I cannot recommend this discontinued model except when attached to an ankle band.
This summer (2013) I purchased the new Sigma Stereo. It is a USB rechargeable tail light. I used it, simultaneously with a Tail Blazer this summer while on a 3-day 1200K. The Tail Blazer was much, much brighter, according to other cyclists that rode behind me. The Stereo wastes it wattage by illuminating a cute ring or border around the perimeter of the light, which does nothing to attract motorists at a distance. I cannot recommend this tail light either.
November 2013 Update: I picked up a Lezyne Micro Drive. It is designed ONLY to fit on a seatpost. I use this light for daylight use. It is rated at 100 lumens in flash mode. It is USB rechargeable and is reasonably bright for daylight use. (They have now have a newer model called the Micro Drive 180 that is brighter). I also made a small awning out of gaffer tape, so the light is more visible during the day. I now use it regularly on training rides as it only lasts 3–4 hours. The build quality (CNC machining) on all Lezyne products is incredible. For a front daylight running light, I use the similarly designed Lezyne Hecto Drive, which is rated at 70 lumens in flash mode.
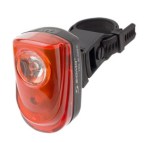
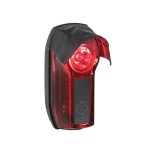
During the summer of 2014 one of my distributors starting carrying Portland Design Works (PDW) lights, so I decided to give some of them a try. I tried the USB-rechargeable Aether Demon (1/2 watt) and the RADBOT 1000. The Aether Demon is not quite as bright as the Lezyne Micro Driver Rear, but I can get about eight hours in blink mode from it. In September of 2104 I did a 420-mile relay race solo style, with about 500 others (there were only 9 solo riders). My support crew that was following me reported that the combination of the 1-watt PDW Radbot 1000 on my seat stay and a 1/2-watt Sigma Tail Light mounted to my ankle, was “hands down” brighter than any other cyclist they saw that night…and they saw hundreds of them. The only thing I do not like about the RADBOT 1000 is that it requires a flat Phillips screwdriver to open it when replacing the AAA batteries — but then, one needn’t worry about the front part of the light separating from the base as is the case with some other brands (many cyclists wrap rubber bands around their lights for this purpose “just to be sure,” but that is NOT necessary with this light). Also, there is no rubber gasket seal like the PrincetonTec Swerve, so I am left to wonder if it will leak in heavy rains. I asked the rep at PDW about rain and the response was “We do certainly see some lights come back that have had water leaks but it’s always hard to tell if it is an issue with the light or weather the rubber gasket got popped out a little when batteries were changed. Living in the Pacific Northwest we certainly put all our lights to the test on a regular basis as far as rain goes.” As a side, the 1/2-watt PDW Danger Zone doesn’t require a screwdriver to open. All three of these PDW lights use the same mount, which has a little slop where the clip on the light mounts to the mount, thus hopefully providing a some give, yielding a “rumble strip, fail safe” attachment.
Many of the reviews (i.e. as seen on REI.com) do not give the Niterider Sentinel 150 glowing reports. The mount has issues and fails easily. It also doesn’t have a memory so when one shuts it off, it doesn’t restart on the same mode.
Fall 2017 Update: PDW has introduced the Daybot USB Tail Light. It puts out up to 100 lumens for daylight visibility or it can be switched it to 20 lumens for night use. (The upper LED puts out 100 lumens, whereas the lower LED puts out about 20). It is USB chargeable and claims to provide 20 hours of use in daylight pulse mode (I found it only provides 10 hours when used continually). It uses a different mount than my other PDW lights, so I can’t move it around on my other bikes that have the old-style mount already on them. This light on the night mode is great with it’s quick flashing light, but the daytime mode has a very slow “pulse” cycle. It cycles between the upper brighter LED and lower dimmer LED; the day mode doesn’t have a similar “quick blink” mode. It cycles onto the upper bright light 20 times in 34 seconds. The night quick cycle mode is about 2.5 times faster. I am fearful that a motorist might glance over while the LED is dark and not see me. Perhaps this was done to prolong battery and also to not irritate other commuting cyclists.
In 2017 I purchased a pair of the Seattle Sports GloStraps and attached them to my calf. On a rural 400km brevet (with little ambient city lights) I then asked some friends that were 1/8 to 1/4 mile behind me to evaulate. At distance, it was rather ineffective compared to my 1/2-watt blinky light, which was mounted on my seat stay. There are other brands with similar offerings and my feeling is that they may be useful for commuting or when in traffic as it gives motorists that are in close proximity 180-degree visibility, but for general lighting purposes I would not bother. Instead I have mounted a secondary blinky to my reflective ankle bands.
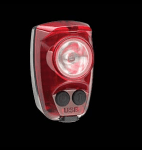
December 2017 Update: I got my hands on the Cygolite Hotshot 150 USB tail light. The tempo of the daylight blinking light setting (they call it DayLighting™) is adjustable (which was my gripe with the runner up light, the PDW Daybot USB) so it can set to a very quick pace at full power with 150 lumens. The slowest setting provides some 38 hours of light (verified). It also has solid modes and for my solo night riding, the Triple Flash mode. The mounts on previous Cygolite tail lights were cheaply designed and broke off when I hit a series of rumble strips. This mount has been redesigned and so so far, it is holding up.
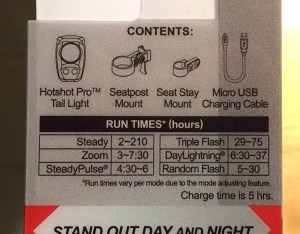
Specs for the Hotshot 150.
There are four factors when choosing a tail light:
Sturdiness of the mount when used on a seat stay, which is my preferred location. So far, many that I have tried either break off (Sigma & pre-2016 Cygolite) or droop (Princeton Tec with OEM o-rings). The PDW RADBOT 1000 is the best I have tested thus far. On my Trek Domane road bike, the seat stays are very skinny and consequently the clamp-on style lights sometimes require stuffing some scraps of closed cell foam inside so it will clamp down tightly. The Princeton Tec shines in that regard as it uses a stretchy o-ring instead.
If you are doing long “straight through the night” 600K brevets or 24-hour style rides, be careful with the rechargeable models as some only last 5-7 hours (update: many 2017 models have improved run time and now go for 15 to 20 hours blinking on a charge). On the other hand, most AAA-battery models last 20–30 hours.
Brightness. Lights with multiple (i.e. 3-6) LEDs are usually dimmer than one bright light. Get one that is at least 1/2-watt (1 watt preferred) or 50 lumen (150 lumens for day use).
It is weatherproof. Will it leak in heavy rains?
Since I usually have a seat bag of some sort on my saddle, I always mount my blinkie light on the left seatstay.
Summary…
For all daylight rides, I consistently use the Cygolite Hotshot 150 USB as my “daylight running light.” I can get 12 to 15 hours in a moderately slow flash mode.
For night riding, I keep the Hotshot 150 on my bike but turn it off and use either the 1-watt PDW Radbot 1000 or PrincetonTec Swerve mounted to a seat stay. This is supplemented by a Sigma Tail Blazer, mounted to a custom reflective strap on my ankle. I prefer tail lights that attach to the seat stay, as I frequently have a seat bag that covers up the seatpost and attaching a light to the bag rarely yields a light that is facing the correct angle in the back.
For a front daylight running light, consider something with at least 200 lumens and with a single LED, not a light with multiple dimmer LEDs. I have been using the Lezyne Hecto Drive, which only puts out 70 lumens in flash mode.
This post is for those struggling with swimming flip turns. During the 2012–2013 winter season (the winter is when I do most of my swimming) I have found that open turns are faster for me, but nearly every source indicates that a flip turn is the only way to go when swimming freestyle. Hmmm, read on.
There are some great videos on how to do and improve an “open turn” at the bottom of this page. I have found that by doing this type of turn, instead of a flip turn, that my breathing issues have disappeared.
BASIC STEPS OF A FLIP TURN
>> Good individual photos. Hover over white boxes in photos for additional tips. Below are the relevant steps reviewed on this site called Instructables.
Step 1: SWIM TOWARDS THE WALL Gain momentum towards the wall by swimming freestyle into the wall in the center of the lane (if possible). Generally, the more momentum you have, the faster your turn will be. However, be sure to start off slow on your first few practice runs! It doesn’t feel good to run into the wall.
Step 3: START ROLLING When you are directly above the T on the bottom of the pool, begin your half-somersault. Tuck your chin, kick one last hard kick and finish your arm pull with your hands ending at your sides. Step 4: DO THE FLIP
Tuck your knees and chin into your chest as tight as possible, and pull your feet into your butt. Use your arms to keep the somersault going by pushing the water up towards your ears with your palms and forearms. Step 5: STRAIGHTEN UP As you complete your half-somersault, straighten your arms out over your head and put one hand on top of the other. Point the tips of your fingers in the direction you want to go, which is directly down the pool. Be sure to squeeze your arms tight! From the waist up, you should be in a streamline: think of making your body match the shape of a torpedo. Long and tight! PLANT THOSE FEET Extend your legs out of the curled ball, and plant them squarely on the wall approximately 6” under the surface of the water, toes pointed up. As you get better, you will want to be close enough to the wall that your hips and knees are both making 90 degree angles, as is you’re sitting straight up in a chair. Step 6: PUSH OFF Launch yourself off the wall by straightening your legs and moving your entire body in a tight streamline (remember, torpedo-like). Staying on your back, push straight off of the wall. Remember to keep your eyes on the surface of the water and not on your toes or your destination!
Step 7: KICK To maintain your momentum, kick your legs are you are leaving the wall. There are two types of kick to choose from at this point:
· Dolphin Kick : Keeping your legs together, move your body in a dolphin-like motion or,
· Flutter (or Scissor) Kick: Separately kicking your legs the same as during the crawl stroke.
It all depends on your preference and what’s faster for you. As you become more comfortable with the turn, play around with both kicks to decide which is best for you.
OTHER SITES
Research indicating that flip turns can cut off 26 seconds in a 1650 yd Free Race
From Go Swim: video 1, video 2, video 3 and video 4.
Traditional flip turns are generally accepted as the fastest way for freestyle stroke and an “open turn” is generally accepted as the fastest way for breaststroke or butterfly. Video 1 says that this method of an open turn, is as fast, if not faster than a flip turn. Personally I have found that this turn is much faster than the somersault flip turn. I don’t get a dizzy and get an extra breath this way.
Their mantra is “speed in” and “speed out,” the faster you approach the wall, the faster you will leave it. Be sure to NOT grab the wall and pull yourself into it.
Small fracture near the top tube, seat tube, down tube junction. The cause of this was because the original seat tube was simply too short, despite complying to the “min. extension” warning on the tube.
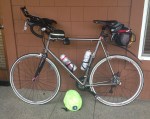
Original frame in “ready to roll” configuration.
New frame
Made in China…or Canada?
Ever since I started riding with other randonneurs, the mantra has been among many of them that “steel is real,” dismissing carbon fiber as inadequate for long distance cycling. Many of them prefer a steel or titanium frame because of the ride quality and most importantly, the durability. They claim that carbon fiber (and many aluminum frames) simply don’t have the long term strength to hold up to the thousands of miles a typical randonneur puts on, especially over multiple years of use. I figure that I can purchase a carbon fiber bike and if I get five to six years out of it, that is good enough, since it is lighter, which for me, at the age of 58, yields high performance.
In April of 2010 I found a new 2009 Rocky Mountain Prestige 70CR carbon fiber road bike at a Salt Lake City shop. I got this model because it has relaxed geometry including a tall head tube — an important feature for my tall 6′ 4″ height. Rocky bikes are noted for their big lineup of mountain bikes and not for their road bike line. Their retail pricing was typically much less than the big brands like Trek, Cannondale or Specialized. With a close-out discount of 30% I was persuaded to make the purchase.
For the next two years I put on about 13,000 miles on this bike. In the fall of 2011, my local mechanic, while doing an annual maintenance overhaul, which included lubing the bottom bracket, pointed out a hairline fracture on the carbon fiber near where the alloy bottom bracket attaches to the carbon fiber. I took the bike up to the dealer where I made the purchase. They opened it up but didn’t think there was an eminent problem or possible frame failure. The warranty for this bike frame is five years. I continued riding it and the following summer, it started to look worse. This time I e-mailed photos to Rocky Mountain Bikes in Canada for review. After they reviewed the photos they promised me a new frame, which was later (July of 2012) delivered at no charge to me. I did have to pay my local mechanic to strip off the old components and put them on the new frame. Their customer service was professional and quick.
So were my rando-cycling friends correct in indicating that most carbon frames will not last? Do all brands start to crap out after 10 to 15,000 miles? Or is the problem only with this off-brand road frame, whereas a frame from one of the big three manufactures would last longer? I believe that many randonneurs, quite frankly, just like the aesthetics of old school components. Personally, I just look at the end of the day practical performance, without regard to how cool or vintage my gear looks. I honestly thought I would get five or six years out of this frame, and then if necessary, purchase another frame to replace it. (I affectionately refer to this bike as my “Tuperware bike” since carbon fiber is basically a “plastic” right?) I read recently that the Cannondale pro team gets four new bikes every season (two racing bikes, one training bike and a time trial bike). They would never have a chance to literally wear one out as I did. Most “average Joe” cyclists, that do two or three century rides a season, put on maybe 1,000 to 2,000 miles a year. At that rate, they would never wear out a frame before the components became “old school” and not worthy or stylish to ride in public. So are carbon fiber bikes designed like most consumer vacuum cleaners…to barely last past the warranty period? (I was told this by a Wal-Mart manager—I own a German-made commercial vacuum in our household.)
Meanwhile, I now have a new “Tuperware” bike, but I have also taken preventative measures to prolong the life of that frame. Since then I have acquired other road bikes to spread out the mileage. First I purchased a used 2009 Cannondale CAAD10 aluminum cyclo-cross bike, which now has full fenders for wet-weather training rides or dirt road riding. I can put either road slicks or narrow knobby tires on it. And then more recently, I acquired a 2nd-hand Seven Axiom titanium road bike (the owner was replacing it with a Specialized Tarmac carbon fiber racing frame). I am currently in the process of building it up (including an extra long custom crank) and will have a review on it later. Depending how I like the Seven bike, I may use that frame instead of the Rocky for long events, despite it’s increased weight. (In September I achieved a new personal record on the Seven bike with it’s original components [clunky 53/39 double & a worn out BB]…a 6:59 solo 200K). Titanium is supposed to almost last forever, making it a lifetime investment. The frame I purchased is ten years old and has no indication of hairline fractures or frame problems. Stay tuned, as I ride the Seven Axiom more, with the new crank and gearing, which I just received last week, I will have better opinion on whether steel (or ti) is really more real.
On a side note, on the chain stays of the Rocky frame, it says in bold type “Built in Canada,” yet the new frame, when it was delivered, clearly said “Made in China.” So does that mean the frame is made in China and the components are added in Canada? Hmmm….these days, nearly every frame is made in either Taiwan or China, so it really comes as no surprise.
I want to mention five things about these two devices:
1. Faulty Heart Rate Straps In May of 2012 I purchased the Garmin 310XT wristwatch style “triathlon,” multi-sport GPS. I got it primarily for use with SUP, but also starting using it for cycling (and uploading my rides to Strava). It was supplied with their “premium” heart rate monitor chest strap. When I travel fast on the bike (isn’t that the point of a road bike?), the wind created static electricity causing erroneous readings. Several of my friends have a similar issue with their Garmins. The readings were way too high. At the recent Interbike show I stopped by the ANT+ booth and talked themas this device uses this 2.4 GHz standard. They said it is known problem and suggested I “upgrade” to the standard chest strap. (The ANT+ group is owned by Garmin I was told). After getting a second premium strap from Garmin that didn’t work, they finally sent me a standard one and the problem is now almost gone, but does happen on occasion while cycling. (I will say that their customer service was actually pretty quick and they responded to my e-mails in a punctual manner once I got a “repair ticket” going).
Standard chest strap
So-called premium chest strap
fenix
310XT
2. Waypoint Downloading Problems There was one major flaw when using the 310XT with SUP. When I was attempting to following a route, it was difficult to do on a paddle board because there is no path or road. Consequently, when I got off route (which was often), the GPS freaked out and told me to go backwards to get back on route. (For recording where I have been this unit was OK, but sometimes, like when crossing a wide lake, I want to be able to know where to go, just not just recording where I have been.) So the only way to do long distance SUP travel with a GPS is to put in individual waypoints (which I put it at home using an online mapping app) and “go to” each waypoint. Upon arriving at the waypoint, I reset the GPS with my next pre-programmed point and so forth. I attempted to “go to” the beginning route instead of a waypoint, but by doing this, it recorded each new “go to” as a complete new event, thus making it impossible to record a “complete” event at the end of the day. The problem with the 310XT is that it would not accept downloading from an external source waypoint coordinates—dumb.
3. Lousy Instruction Manuals So, yesterday I took back my Garmin 310XT wrist watch GPS to REI and got full credit and upgraded to the new fenix. It is now doing what I want…that is I can download ind. waypoints from the web and complete routes without. No complete instruction manual was included (only a quick how to brochure). I downloaded the PDF online documentation but it failed to give me a clue what the abbreviations for the data fields mean (the old 310XT documentation DID indicate this). For example what do these mean?
CMP HDNG
Final ETE
Final VDST
Final VSPD
TDD
Next ETE
Next VDST
After doing several Google searches, I found this obscure Swiss site that had the documentation I was seeking.
So what’s new with the Garmin? Same lousy documentation as always (one would think that for a $470 purchase, it might include at least some decent PDF documentation). When you are king of the hill there is no motivation to change.
4. Wireless vs. Wired Oddly enough, the new fenix now ONLY connects to my Garmin via a USB cable, instead of the easier-to use ANT+ wireless system found on the older 310XT. That is odd, going from wireless to WIRED?
5. Maximum Heart Rate Oh, one last thing, while I’m venting. My Sigma heart rate monitor was much more sophisticated in it’s analysis of cardio data displayed one very important stat: the maximum heart attained during a workout. Both of these Garmins, despite having some 50 odd data fields, do NOT display this simple stat—instead I have to wait until I get home and download the data to their website. Dumb. (When doing intervals I LIKE to know, right after a 5 or 10-minute gut-wrenching hill climb, where I maxed out.)
Ever since I started road cycling in 2007 I have had the goal of doing a double century (200 mile) ride in under 12 hours. On Desperado Dual (central Utah ride) I have come close…12:20, 12:35, but with the winds and sparse drafting opportunities I never achieved my goal. This spring I went to Calif. and did the Solvang Double but we had incredible head-winds for the last half so I missed my goal again. So this year I decided to try LoToJa, which held every September (Logan, UT to Jackson, WY). I think there was about a thousand rides. Since this is a sanctioned “race” and not a “tour” or brevet, everyone tended to move more quickly. This event is the longest sanctioned road race in America.
I teamed up with a few local friends, Brian Whipple and Richard Anderson. We signed up as a team in the Citizen Class, Category 5, age 35+ and ending up with a start time of 7:13 a.m. The morning of the ride was pretty typical with temperatures at about 45F as I recall. I did not wear long finger gloves and wished I had as they were very numb for the first 90 minutes of travel. I worn only my jersey and arm warmer which was just barely enough. Everything went according to plan…Brian and I stuck together as Richard went off the front, staying with our age group. We worked with various groups at times and also just the two of us at other times. Upon completing the first climb up Strawberry Canyon, Brian’s son-in-law, Matt caught us. We had left about 10 or 15 minutes after us in a different age group. His stomach was giving him minor issues, but we pushed him in and out of the feed zone so we could keep things moving along. Later in Afton, at mile 125, Matt’s stomach got the best of him and he had to stop and lay down for a while. Brian stayed with him (along with our support crew) and I continued on. Soon after leaving Afton I happened up a large and well-organized group with Bank of A.F. jerseys. I latched on to them and essentially rode behind them all the way to the finish. On three separate occasions, when they were going too slow (I was never pulling, so I always felt full of energy), i.e. on climbs, I would jump ahead of them, hoping there might be another group I could hook onto to. It never found another decent group and I always got scooped up by them. As it turns out, this is the same group that Matt started with, but dropped out due to his G.I. problems.
In the end, my official time as 11:19, much better than my expectations. The weather was perfect, topping out at about 80F and little wind and no precipitation. Richard was just off the podium (4th or 5th in our group), but would have been a first-place winner in several of the other groups his age…but our assigned was just faster for whatever reason. Bummer. As it turned out, Brian (who also wanted a sub 12-hour time) rolled in with Matt about 3 or 4 minutes before the 12-hour mark!
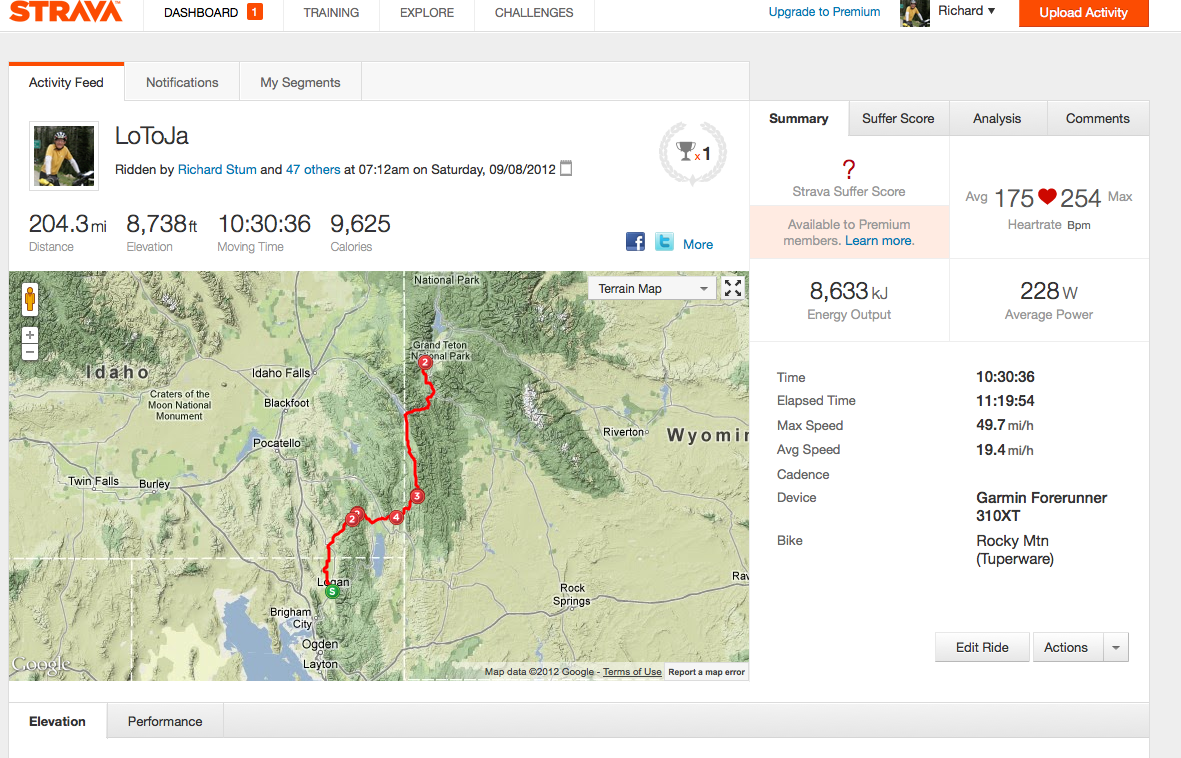
Many thanks to the spouses of Brian and Matt for their help at the feed zones. They had fluids and nutrition there so we barely had to unclip and were able to keep quickly throughout the day. As you can see by my Strava screenshot, my total time off the was 49 minutes for day. There were a few neutral feed zones that were well stocked and the volunteers were excellent at attending to our needs (except for lines at some of the porta potties).
Strava Upload. Ignore heart rate specs as the Garmin chest strap wiggs at high speeds.
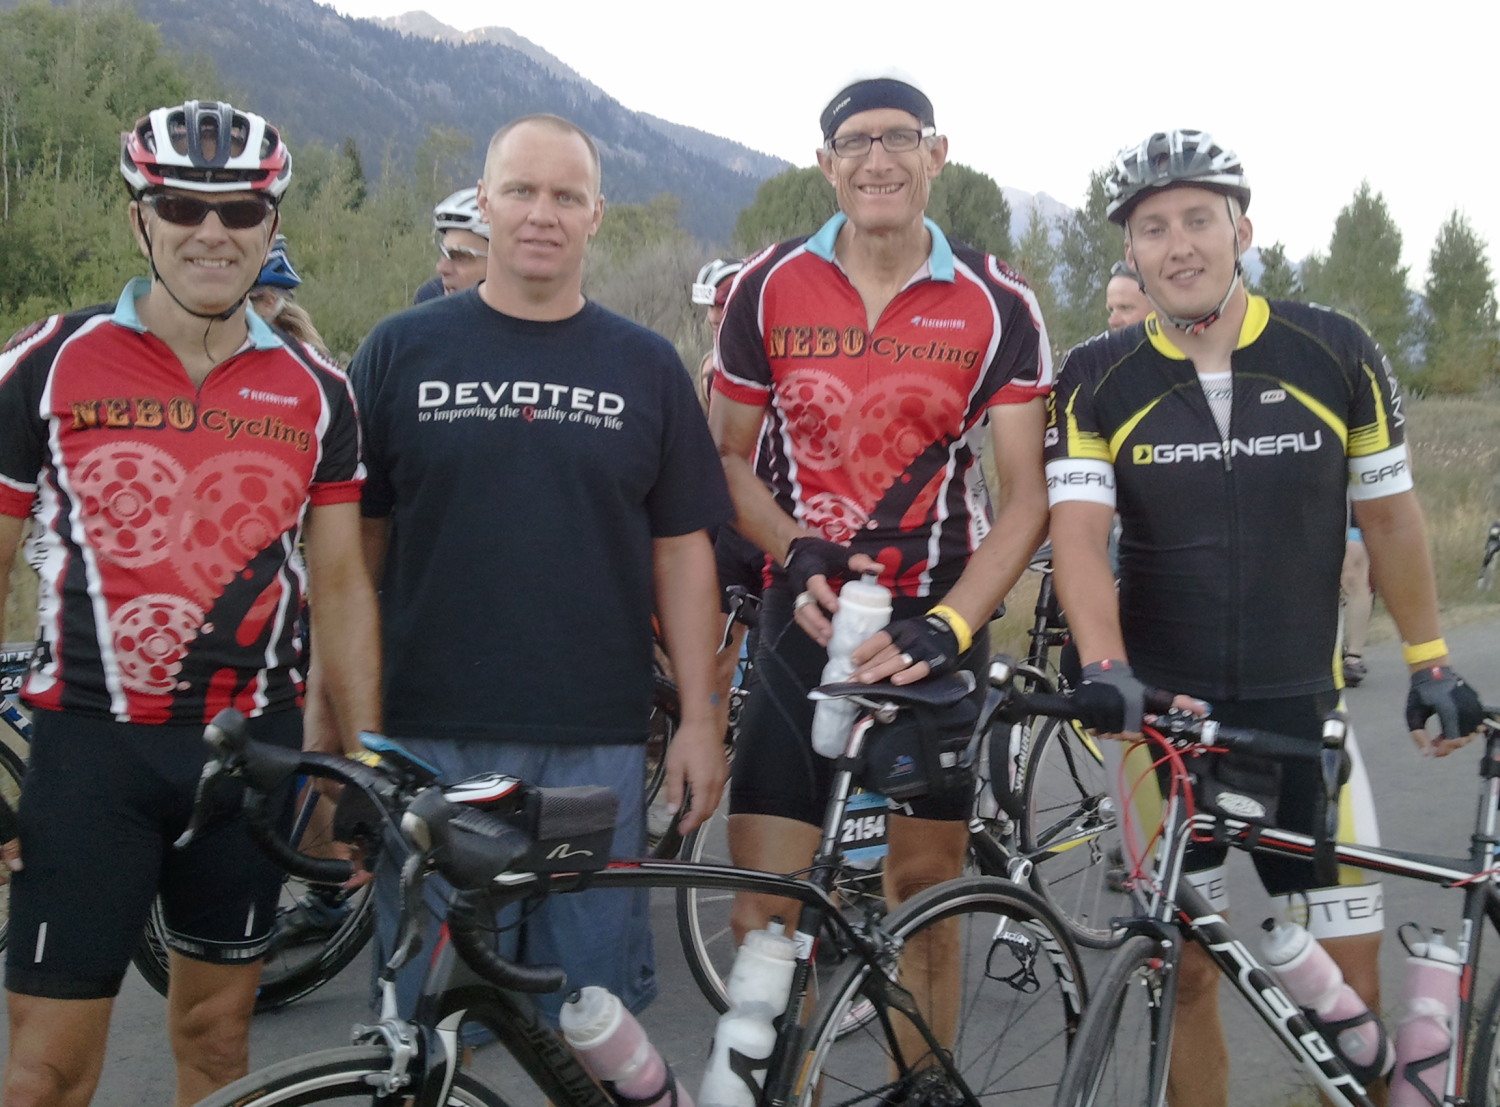
Start line at about 7 a.m. in Logan
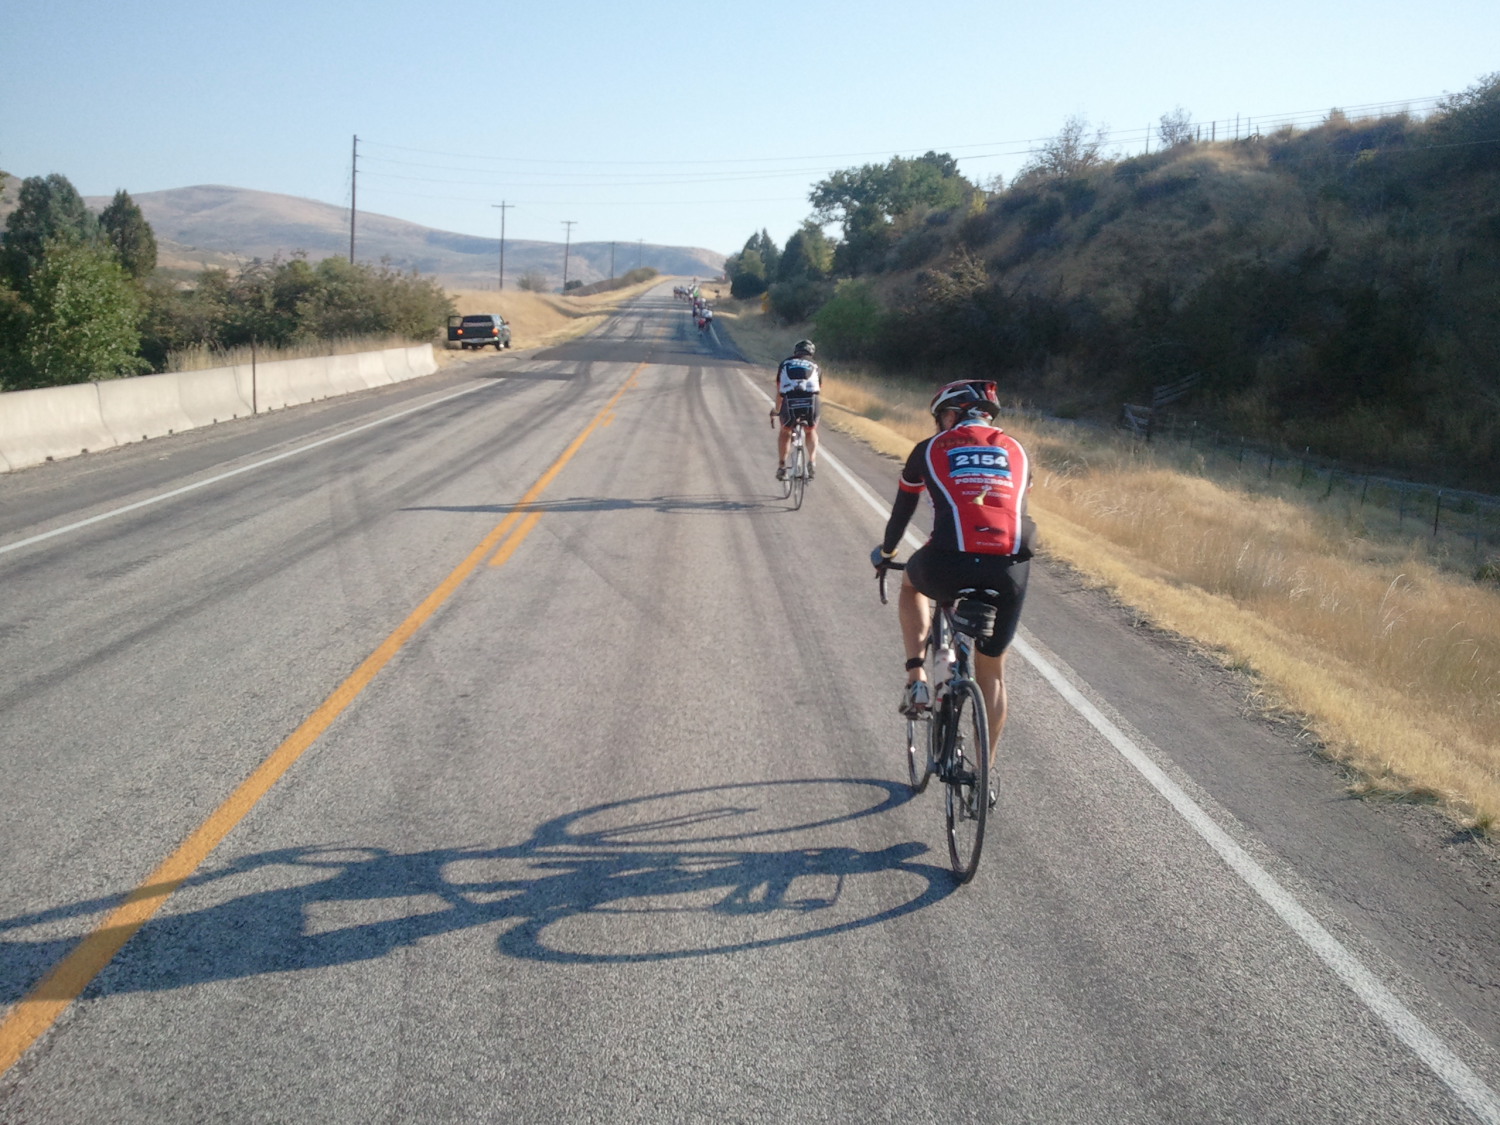
First real climb of the day up “Strawberry”
Feed Zones
Bank of American Fork group.
Snake River (fussy, shot “on the fly”)
Just after passing through the finish line in Jackson Hole. Note the Grand Teton in the background.